About Me

Showing posts with label TAST 2. Show all posts

Monday, December 27, 2010

TAST 2010 - WEEKS 38 - 44


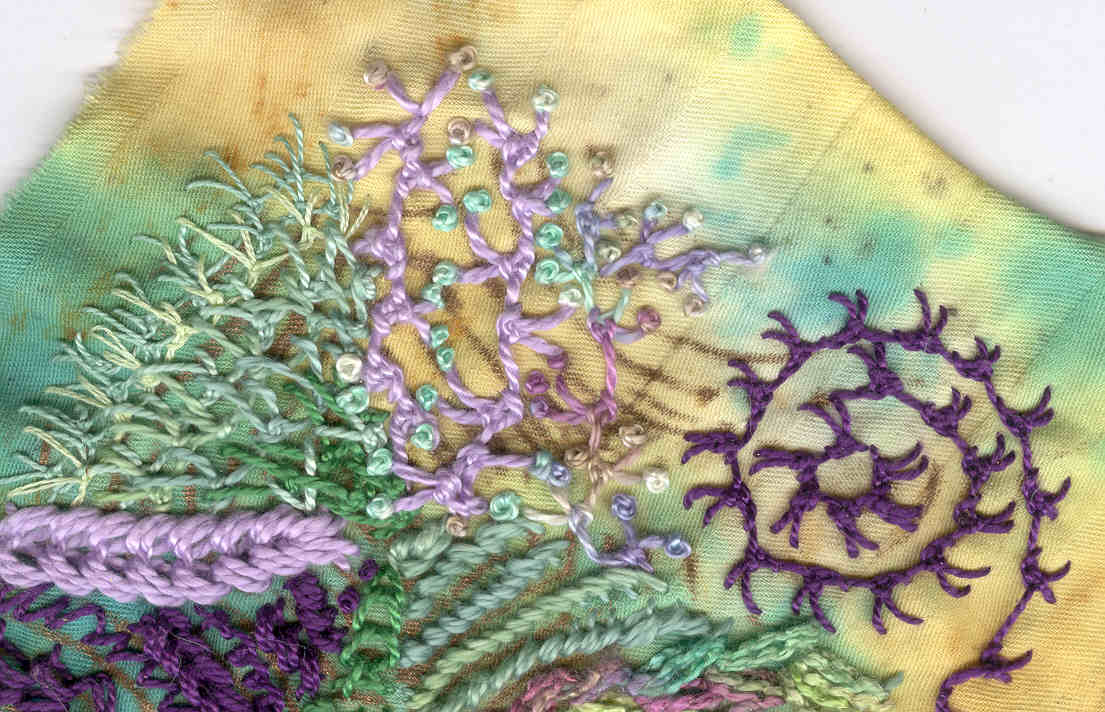
This is as much as I got done in the assigned week.  I kept thinking I would add something else or take something out, but I never got around to it, and now I don't remember clearly what I was trying to do.  I can see I worked a spiral, worked the chain with picots on either side, and worked the chain zigzag.


The background cloth is another piece of tea dyed dish towel.  The Watercolour shows up a little better than the Wildflower thread, but there's not much to see.  Sadly I didn't put a lot of time or thought into this assignment.  It was Thanksgiving week and I was juggling two overlapping online classes.  The picots are lost in the terry loops, and because they're placed randomly along the irregular lines, they're hard to spot anyway and not worth the effort IMHO.  I'll simply say the upward spikes have bullion picots and downward the chains. 

Magic Chain:  3 rows of chain just under TAST '10.

Woven Cross:  above and below the single line of beads.  I considered weaving the lettering which I added later, but ran out of time and steam.

Crossed Feather Stitch:  the top row, worked in Wildflowers.

Plaited Feather:  bottom rows.  If you look at the tangled center, you can maybe see I worked the plaited version between 2 rows of straight-sided feather stitch.

Even though my work was lackluster toward the end, I feel a sense of accomplishment for having completed the challenge and extreme gratitude to Sharon B for leading us through this wonderful learning adventure.  Tuesdays will not be the same without a new stitch to look forward to.  I'm thinking I might pick up the ones I missed in the original TAST challenge, and after that I'll probably tackle the Stitch Files.

You can view all of my TAST 2010 work here and original TAST here.
You can also view the photo pool for all TAST '10 participants here.
Join all of us at Stitchin Fingers, an international, online community for all manner of stitchery, fiber and needlework.

Saturday, August 14, 2010

TAST 2010 - SIENNESE STITCH

                                       Take a Stitch Tuesday, Week 24
The Siennese stitch may look like a cross stitch, but it is constructed quite differently.  Click on the link above to see the tutorial.  There is a twist in the thread at the center that provides texture to the stitch, but it's difficult to see when rendered in a dark thread or in a smallish stitch. 

I experimented with 11 different threads and yarns to make the Siennese stitches.  You can see I've used them as individual, pattern grouping, and couching stitches.  I think the background is a 28 ct. lugana.  The grid-thingy is a piece of latch hook canvas that I dyed.  Here's another orientation. 


Tuesday, August 10, 2010

TAST 2010 - TRIPLE & WAVED CHAINS


Weeks 22 and 23 of Take a Stitch Tuesday - chain stitch variations.  Not much to say here; the stitches were easy to work and and afforded some interesting possibilities for change.  With the triple chain I played with the orientation of the side chains and then placed the triads in different arrangements.  The zig-zag one doesn't show up well; I should have used two strands of floss to stand up to the #5 perle.  I worked this pattern using two needles.

The wreath is made from two different variegated green threads, but I did not work the leaves in pairs.  I worked stitches in one color first and then filled in with the other.  The two vertical lengths of waved chain are similar and used the same double strands of floss.  In the skinnier one I work each bottom stitch through the same hole.

A word to thank all of you who read my blog and take time to leave much appreciated comments.  I am not ignoring you!  I do love to look at your work and leave feedback and hope to resume that practice again.

Friday, July 09, 2010

TAST 2010 - SWORDS, WAVES, FEATHERS

 I'm sapped.  It's stress.  My work here lacks the sense of stitch adventure I usually try to convey.  I enjoyed the stitches, and it wasn't as though they didn't lend themselves to creative re-interpretation, I just didn't have the energy to think outside the box.  On the other hand, I am caught up!
WAVE STITCH - WEEK 18
I started with a piece of fulled wool.  There was a piece of dyed cheesecloth stuck to it like it wanted to stay.  I spread it out with no particular shape in mind, and I let the rest of the scrim dangle because I didn't have any scissors at the time.  There were also bits of threads stuck to the cheesecloth, so they got to stay, too, and eventually I added more snippets.  With nothing special in mind I started working the wave stitch with a variegated #5 perle.  I liked the way the cheesecloth sort of pouffed through, so I kept going.  After a while I turned the piece upside down and started down from the opposite side.  Not sure where to go next, I rotated the piece and considered the possibilities (remember, there's still a glob of cheesecloth hanging off one end!).  A plumed helmet?  With stuff dangling from the earlaps, perhaps?  A vessel?  There's something about that concave -- a maw.  And teeth!  I'd found my direction.
I worked wave stitching from both sides until I was about a row apart at the center.  I simply laced to join.  For the tail I cut off the excess scrim to leave enough to fan out.  I stabilized the tail with some gathered tulle that I stitched from behind.  I knotted in streamers, and these are longer that what you see above.  Finally I added a button eye so you'd sense it was a creature.  That's as playful as I could muster.

WEEKS 17 AND 19 - SWORD AND UP AND DOWN FEATHER STITCHES
The chain stitch was already on this piece of linen .  If you look at the large blossom you can maybe see where I worked 7 sword stitches, hilts to the center capped with French knots.  I then placed lazy daisies around the blades of the swords.  I'm not sure what the thread is, but it's a boucle cotton.  It was my first time using it, and I like the effect.  The smaller flower is worked like the larger ones.  I used two strands of cotton floss to make sword stitch greenery.  I used a variegated #5 perle to work the first layer of up and down feather stitch, followed by a layer of 2mm rayon ribbon, and finally a few stitches with 2 strands of floss (blue).  To fill space I added a few vintage buttons.

Saturday, July 03, 2010

TAST 2010 - ITALIAN KNOTTED BORDER STITCH

Take a Stitch Tuesday - Week 16.  The Italian knotted border stitch looks deceptively like the knotted fly stitch.  Once you work it, though, you realize the major difference is where the knot lies.  In the Italian knotted stitch, the knot, specifically a French knot is formed outside  and below the "V".  In knotted fly, the knot is created in the V before adding the stem.  In other words, the French knot is the stem in the Italian version.
I began in the center with a single French knot, around which I placed 4 Italian knotted stitches, knots inward.  Then over each leg I worked the same stitches knots facing outward this time, and I worked in an extra stitch wherever there was a gap. Next I  worked stitches knotted outwards , beginning the legs from the previous row of knots.  The I worked a round of overlapping stitches.  This inner "flower" was done with two strands of silk floss.  I switched to a single strand of Watercolours and worked a circle of French knots around the flower.
From those knots I worked a round of Italian knotted stitch, knots outward and surrounded by two lines of laced running stitch.  The final border is comprised of pairs of Italian knotted stitches worked knot to knot, French knots in between.

Wednesday, June 16, 2010

TAST 2010 - LADDER STITCH


Week 15 - Ladder Stitch was love at first try.  It can be worked in a very orderly fashion.  Even better it can be varied both vertically and horizontally, shaped, worked solo or side by side.  But best of all can be woven leading to myriad other possibilities.  Here is a stitch I can play with.  I was delighted  with this little bit from my doodle cloth.   At first glance I thought it was pretty cool just as an abstraction.  Maybe it's all the Zentangling I've been doing lately; I sense a hint of 3-D perspective.


I didn't have too much in mind for my sampler other than a composition of grids.  It was when I started weaving in parrot colorway that the idea of feathers arose, and next came the challenge to see if I could build an avian shape with just ladder stitch.   This is what I came up with free stitching (no pattern or outline).  I think it's recognizeable as a bird?
Although I'm through with this for now, I seriously thinking of going Crafty Chica and adding sequins & beads to the background.  Pity you can't really catch the glitter cord sparkle.

Friday, May 28, 2010

TAST 2010 - RAISED CUP STITCH

OMG is that background what I think it is?  It is if you're thinking towel!  I made a batch of Earl Grey tea stain the other day and couldn't just pour the leftover down the drain.  What was handy was a threadbare dish, er, tea towel I'd used as a blotter from my last dye session.  "I wonder what it would be like to stitch on?", I mused as I stuffed it into the Pyrex measuring cup that held the tea.  As soon as the towel was rinsed and dried I found out.

I finished Week 12 early, so I was happy to keep my fingers from wriggling in anticipation of  Monday Night and the latest TAST temptation.  I worried (not really, this was a rag!) about embroidery needles and sharp points catching on  tiny, terry loops, but since the velour finish had long ago worn away from the printed front side, the fabric was very giving and yielded to my large tapestry/yarn needles with ease.  For this sampler I ended up using only #5 perle cottons and fingering weight wool/silk yarns.

About 2/3's down I started a line of twisted chain.  I wanted a little more height so I layered a second row right on top. You can see I got much better dimension with yarn seen in the single layer of twisted chain below (brown).  The gray line is knotted buttonhole stitch threaded with a piece shiny raffia, probably something that once tied up a package.  Seems like I had just gotten down that charcoal line of Sorbello than twas time to download Week 13, Raised Cup Stitch!  Am I the only one who has a pavlovian response to Sharon B's challenge posts?

I got all of those raised cups stitched waiting in a doctor's office for DH.  They are all worked with the silk & wool yarns.  I love their organic shapes, how they flop and smoosh together.  The white one in the center  is an example of decreasing to make the cup turn inward.  The coppery bit you see are "stamens" emanating from a French knot.  I added irregular cretan stitching awaiting DH's lab work the next day, routine medical, btw.  I was satisfied that that finished the upper portion, but had to experiment a bit to get the rest as you see below.
I tried couching down some pussy willow yarn, had a little spiral going, but the color seemed to light.  I made it worse by weaving in a darker yarn.  Ugh.  Check out the raised cup centers, wooden and agate beads too big, faux pewter spacer beads.  No, no, no.  Too fussy.  Not in keeping with the rustic look I wanted.

What was I thinking?  That thing ,btw, is a freeform crocheted motif that's been waiting around forever to unite with its  kind to become a scrumble.

So I end up with unfilled cups and graduated French knots on the bottom.  Swapped out some of the beads in the other row with French knots --  and
a bullion (white cup on the left!).

And now a sort of tutorial.  Working the raised cup stitch reminded me of a motif I learned a few years back on the CQ Embellishers forum.  I was thrilled to make it, especially since I hadn't learned any fancy stitches.  The other Embelles used this effectively as sea anenomes in some of their wonderful underwater fantasies.  The motif is so simple, it really doesn't require illustration.

Thread a tapestry needle with yarn or chunky thread.  I find this easiest to do on my left index or little finger, but a pencil could be used instead.   Begin at the top finger joint and wrap the yarn upwards about four times, covering the tail as you go.  Wraps should be loose enough for you to work the needle underneath.  Pass the needle downwards behind the wraps, holding the top coil with another finger.  Now work around buttonhole stitch around, pushing the
stitches close together.  When the round is completed, weave in the end.  You now have a little ring motif you can stitch to your work and embellish with beads.  I used to like to make these using a funky variegated yarn, sparkly and frizzy.  They can also be used to make little nests as in the example below

This is from my project for Sharon Boggan's Encrusted Crazy Quilting class.  If  you haven't tried one her courses, you do not know what you're missing.  They are outstanding and comparable to a semester of study complete with textbook. 

Thursday, May 20, 2010

TAST 2010 - SORBELLO

I've become a real fan of knotted stitches for the extra texture they provide.   Sharon B gave us beautiful examples of Week 12's Sorbello stitch, which makes interesting patterns when used in repeats and presents itself nicely for the addition of bead embellishment.  She had one example of the stitches worked densely together as a filler, and she varied a thread or two adding color and textural variety.  I really liked the appearance, but I didn't want to copy her application.  I chose to apply a similar version as a border.  My stitches are more open, and I used a single variegated thread (Watercolours, one strand).
It's dense and textured enough, though, that glancing at the actual cloth, the stitching almost looks like crochet or chunky cotton lace.

My next variation was going to be a line of elongated stitch alternating high and low positions of the knot.  I discovered it was easy enough to work side by side stitches this way by varying the tension of the first part of the stitch .  When I went to work it on my sampler, I decided to do it in two passes, working the upper knotted stitches and leaving spaces for the lower knotted ones to be filled in afterward.  Using a single strand of a different Watercolour thread, the stitches were too dense.  Too many threads made the line too busy and the high-low knot effect got lost.  I'll try the technique another time, maybe even experiment with alternating colors.

After removing the second pass (lower knotted) stitches, I decided I liked the spacing, which led me to place the lower knotted stitches directly below their counterparts, creating a nice diamond in the negative space (perfect for a seed bead or French knot?).  To me the obvious next move was to at least partially fill the spaces between the stitches and balance the high-low with a centered knot at the join line.  For this I used 2 strands of hand dyed cotton floss that matched the deeper colors of my border thread.

At this point I realized my remaining stitching space was limited; spirals, curves and the like would have to wait for another project.  I opted to repeat the first two rows.  This repetition gave me another the appearance of little circles (a skinnier thread would have produced little diamonds).  Nice.  I could have left the sampler alone at this juncture, but something else was needed to fill the void between stitches of the center two rows.  I thought X's  like I did in the other rows would crowd and distract from the little O's.  I didn't want to introduce a new thread either.  I took a single strand of the floss and made the elongated, center knotted X's.  I like the look.  The background space is filled but subtly.  There is certainly room still for beads and French knots, but I'm going to let that go -- for now.


Monday, May 03, 2010

TAST 2010 - RAISED HERRINGBONE BAND

For these weekly studies I rarely plan a design first.  If the stitch is new to me, I practice the basics on a doodlecloth .  When I can grasp the mechanics of the stitch, I don my thinking cap then may or  may not scribble down  the variations I come up with.  From  this point I pretty much work spontaneously, although I do strive for a reasonably balanced composition.   I'm no stranger to the frog pond.  Sometimes experiments fail or need to be further modified.
  
This stitch was somewhat deceptive in that it changed with each layer. Combinations of threads and yarns I thought would work, didn't always.
I started with scraps of onion skin dyed Aida and cheesecloth.  I think scrappy, shabby and rough were in the back of my mind.  Generally I begin with what I deem will be the largest of stitch elements.  In this case it's the shaggy diagonal.
Instead of a satin stitched foundation I used a piece of oversized,  faux suede ric-rac.  I centered the herringbone over the zigs and zags and then wove in the chenille yarn.  Next was the light blue diagonal in #8 perle.  The herringbone is worked in silk/wool yarn, and the lacing is cotton suede.  I used the same yarn for the satin stitches on the curvy diagonal that intersects the ric-rac bar.  This element was intended to show curves and irregular foundation width.  Blue herringbone with French knots are two strands of cotton floss which is then woven with a strand of Vikki Clayton's silk perle from her dragon series.  I don't know if she still produces this color, but it's been one of my faves and now I'm out of it because I used it liberally throughout this sampler.  You can see it clearly in the unembellished, uneven satin diagonal in the lower left and echoed in the two vertical curves of satin foundation on either side of the big spiral.  Those two have cotton perle (#10 or#12) herringbone and then laced with strands of eyelash yarn (those are the brown strings you see in the picture, some of which are copper metallic).  What's really neat, to me, is the way the lashes arch and hang over adding a third dimension to the sampler.  A shame that effect doesn't show up in the scan (how could it, the lashes are all smooshed down!).  I later worked the same dragon perle as a running stitch border line before fringing the background fabric.

The large spiral is worked in Caron watercolours .  It stands "naked" because nothing I tried worked over it to my liking.  Ditto its counterpoint circle in the lower right.  This leaves the, um, motif in the upper right.  The horizontal brown bars are #8 cotton perle, as are the vertical blue ones.  Just for fun I wove one of the intersections.  Herringbone is worked over and beyond the horizontal bars in Caron wildflowers (same color as the spirals) and laced with an elastic  cotton yarn that's nubby with metallic copper flecks.

I encourage readers to discover how other participants explore the  TAST2010 stitches.  Please visit our Flickr  group site.


Saturday, April 24, 2010

TAST 2010 - FANCY HEM STITCH


WEEK 8 - FANCY HEM STITCH

This stitch was easy to work and offers endless possibilities for variance and additional embellishment like weaving or beading. For this sampler I let the lines of stitches stand on their own, as I wanted the colorplay to be evident.

The background is another swatch of hand dyed cotton. The color is a yellow orange with mottles of burnt orange. The threads are all DMC #5 perle, except for the variegated ones which are Caron's Watercolors.
Mostly I experimented with stitch size and number of wraps. Here's what I did starting from the top:

Row 1 - Smaller stitches, with foundation lines close together with maximum wraps around the bars.

Row 2 - Same as first row except fewer wraps.  I  discovered with stitches this small I was able to keep the   wrap thread entirely on the surface.

Row 3 - Slightly larger length and distance between foundation stitching.  With moderate number of wraps the diamond  and "x" are apparent, offering perfect placement for beads.

Row 4 - Stitches are the same length as 3, but foundation lines are further apart and wraps are limited to 2.

Row 5 - Here I laid down 3 foundation lines not too far apart.  I alternated lines wrapped in each stitch; ie, wrapped lines 1 and 2 the first half of the stitch, then switched to wrapping 2 and 3.  Alternating wraps opens the possibility for additional patterning.  I worked mine to form a zigzag.

Row 6 - Varying the height of each stitch.  I imagine this could be worked with greater irregularity for an abstract or distorted look.  To keep wrap tension even I was limited to the number of wraps per stitch.  I realized a problem when I had finished; some of the threads coming and going from the cloth beneath the wraps show.  I'm thinking about ways the larger stitches could be embellished.  An "X" over the wraps, partially wrapping or faux wrapping the wraps, lacing different fibers or ribbon are some of my ideas.

Rows 7 & 8 - Show the stitch can handle at least a gentle curve.

I have not stitched the sampler onto the sangria fabric, and the knotted snippets are not attached.  I just laid them there for effect.

You can see samplers from other TAST participants (at least 200 from all over the world) at the group Flickr site.

Tuesday, April 20, 2010

TAST 2010 - ROPE STITCH


ROPE STITCH - Week 7 of Take a Stitch Tuesday 2010.  It took me a couple of days to figure out this stitch.  It's not difficult, but I often have trouble when orienting thread under needle.  Remember I'm the one that has yet to master the very basic picot stitch in Hardanger.  Hopefully you can see my progress.

The background for the stitches is a scrap of hand dyed Aida cloth.  I worked all of the columns from the top and began on the left.  The first two columns are #5 pearl; the only difference is the number of threads.  Boy, the picture sure shows up the inconsistencies, and YIKES!, I moved over a thread about half way down .  Column 3 was loosely stitched with a strand of Caron Watercolours. It looks sloppy.  I think the reason it's uneven in places is that when I tried to take out a stitch or two it was it was
hard to pick up again.  I finally got the hang of it toward the end.

Column 4, I made the coils closer together, and it looks neater.  I had no difficulty creating the circle.  Column 5
looks like a whole 'nother stitch.  For this I made the coils right up against each other.  It's like satin stitch with more dimension. Column 6 was worked with silk and wool fingering yarn, and it behaved beautifully.  Not so with the slippery rayon thread I used  for the first layer of Column 7.  I stitched a second layer with the Watercolours, staggering the start.

Notice anything different about Column 8?  Nothing remarkable except I worked this and the remaining rows in the opposite direction.  See how the coils slant in a different angle?

I stitched the little sampler onto a piece of batik, the colors of which remind me of sangria.  From here on this becomes a work in progress.  I'll likely play with more buttons and threads.

P.S.  In response to Connie's remark that I may be too self-critical, I have to say I do try to be objective. This is a case where the sampler doesn't look that bad in the fabric, but I confess to shock when I saw it enlarged on the screen. Every flaw (just spotted another, but I'm not talkin') seemed to fly in my face. My posts usually detail my personal learning process of which self evaluation is an important part. When I make mistakes, I share them. I suck up the embarassment and remind myself that some muse wants me to learn by trial and error, to keep myself honest, and ego in check by experiencing creative lessons in humility. :-)

Sunday, April 11, 2010

TAST 2010: BUTTONHOLE EYELET FLOWER


I haven't viewed any of the other samples from the group, but I suspect my flowers may appear a bit different.  They certainly don't resemble anything close to Sharon B's prototype.  Still it was a good experience for me, always nice to add a flower to the stitching repetoire, and it did force me to practice multiple bullions. 

The background is hand dyed silk from Vicki Clayton.  I began with the red petalled flower.  Um, the flower was supposed to have only five petals,  but I don't think it matters how many.  What's wrong with my petals  is I was inconsistant with the number of bullion wraps, so they are not equal size.  I then switched to the three smaller versions.  I did count wraps.  They look askew, but really they are even and could lie flat if I pressed them or tacked them down; I preferred to let them have their more dimensional look.

I got bored with the basic flower, so I surrounded the second large wheel with two rows of flat-lying but curving bullions.  Then I worked the bullion "rose" between the 2 large flowers.  I began with a French knot and used different threads and colors for the petals.  I made bullion clusters next.

Looking at the goofy flowers stitched "naked" onto a piece of cloth, I decided I needed some kind of coordinating element.  This is what happens when one doesn't plan ahead and design first.  I added stems and leaves.  I'm sorry, I have to laugh, and it's perfectly okay for you to join me.  The first flower looks like it's wearing a hat (It's getting close to Derby time here), and the other big flower sprouted wings and looks more like shield backed by crossed spears.  Seriously, what's wrong here is no focal point!  Seriously-er, what's wrong with me?  The challenge does not call for a finished piece of art; no more than the exercise of practicing a new stitch on a doodle cloth is required.  Forgive me.  I type with tongue in cheek. 

The hand dyed (be me!) gauze drape is a nice touch, yes?  I have to brag that the silk perle and ribbon are also hand dyed from  my red cabbage experiment.  I forgot to say the cotton perles used for the flowers were all #5 DMC and the rest is Watercolours.

So what's with the business to the left?  Well, it may or may not be a preview of next week's TAST.  I had in mind to try partial buttonhole wheels as a seam treatment.  I hand stitched on a piece of blueberry dyed linen with the idea that I might continue the colorway next week.  I might -- or not.

Tuesday, March 30, 2010

TAST 2019 - Knotted Buttonhole Stitch


As you see I continued this week's stitch on the same fabric piece as w\Week 4.  I like this stitch because you can work it in just about any direction.  I've used this stitch before, so I did only three things with it this time.  On the left is a green patch where I tried to similate grass using 6 different threads.  I overlapped the rows (working from top to bottom) and made the stems different sizes and working a few of the stitches under previous ones.  The middle section looks kind of chaotic.  What I attempted was to create twigs with the buttonhole stitches worked from either side.  Most of this area was done in #5 perle, but I used a single strand of Watercolours to work a couple of "sprigs" and also the French knots.  On the right is a spiral.  I love how this stitch holds a curve and how the little stems also curve.  I finished early, so I now have plenty of time to practice bullion stitches for next week.
Below is the whole sampler for Weeks 4 and 5.


Monday, March 29, 2010

TAST 2010 - Portuguese Border Stitch


Portuguese Border Stitch
Originally uploaded by Fiberdabbler


Perhaps I should explain the funky background first. I know you would have difficulty recognizing it, but it's from the same sheet fabric and experimental session I talked about in my previous post. I was playing with Dylon cold water dyes. I honestly don't remember if this piece of cloth was used as a rag for clean up or if I was testing colors. Whatever. I rusted the colored results, the ran Shiva paintsticks over a rubbing plate. I found this piece stored with my textured surfaces samples. The lines on it made me think about the spirals and concentric arcs I wanted to try with the challenge stitch. I was thinking about the paintstick lines as a shortcut for marking where I wanted the foundation straight stitches.

I covered the area I planned to stitch with straight stitches following the contours of metallic lines.  I left some of the even stitching bare, as you can see, but hidden below the overweaving are straight stitches of varying length and orientation.  I tried several alternatives weaving over the bars:  1) changing direction from one row to the next; 2) single passes only
(eliminating the second journey); 3) changing direction of the single journeys from row to row; 4) working the two journeys over side by side short stitches instead over one longer base stitch; 5) I tried stairstepping using the two stitches in (4), alternating from one side to the other trying to make a zigzag appearance; I could not get it to work, and 6) weaving or lacing in such a way there is only a single strand look; result -- looks like the rungs were just looped or laced; I couldn't get the same V shape as in the original stitch.

Cotton perles were used and in one instance two strands of floss.  I'm not sure what the variegated boucle is, but it certainly enhanced the texture.  The rows below it were worked with a single strand of Watercolours with very subtle changes.

Wednesday, March 24, 2010

TAST 2010 - BEADED HEDEBO EDGE


This week's sampler is worked on hand dyed fabric (Cashel?) with DMC pearl cotton.  Blue beads are #6 seed; the yellow are cubes.  The fargo rose uses 7mm silk ribbon that I recently dyed with saffron.  As we are encouraged to do in the TAST challenge, I looked for different or less obvious ways to utilize the given stitch. 

In the first row I was trying to see first if the curve could be worked in or out.  It can, but you may have to change direction if you can't work the stitch backward.  Next I wanted to see if  it could be linked by shape.
When I finished the "squares" , I realized I had created little frames which shouted to be filled.  Since the sides lay loose on the surface, I thought additional weaving or lacing could be done easily.  In the left square I used a simple dove's eye as might be worked in a hardanger kloster, and on the right I wove spokes.  My rose looks a little naked in the center.  I remember now that  I had originally planned to attempt my initial, N, which could be easily rendered with three lengths of edging.

The second row began as an experiment to see if two edges could be woven between the beads.  They can, but I left the second strands bare as a contrast.

The last segment is always my favorite to try.  What happens if I distort?  In this case I made the foundation cross stitches irregular in size, length and direction.  Voila!  Abstraction.


Saturday, March 13, 2010

TAST 2010 - KNOTTED LOOP STITCH


The knotted loop stitch is fun to work and offers far more possibilities than what I've stitched here.  Be sure to see the border and stacked examples Sharon B shows on her Pin Tangle website along with the tutorial on how to do this stitch.  Basically it is two straight stitches, upper and lower, combined with a knot

My background is a piece of craft felt with metallic threads that I've dyed and then overdyed with rust.  My fish (silk & wool yarn) shows the usual center placement of the knot.  So does the centipede to the right.
The fun thing is the knot can follow a curved line beautifully, yet the line can appear more to the top or bottom depended on the length of of stitch above and below, as with the bottom centipede.  It creates a kind of spine.  I managed a small spiral, and tried to make concentric circles.  With the "fossil" in the upper left, I tried to skew the stitches every which way.  Even though I varied the length and spacing of the straight stitches, the "spine" is still evident, just not as knobby.  Incidentally the other threads used on the sampler are a gold perle cotton and Caron Watercolours and Wildflowers in the same colorway.

Do look at Sharon's samples.  She shows a thick and thin border , filler possibilities, and flowers!  There is a Take a Stitch Tuesday group on Flickr if you'd like to see amazing work by global participants.

Tuesday, March 09, 2010

TAST 2 - DIAMOND STITCH

The diamond stitch is a knotted stitch, and I wasn't able to do much with it.  The background is hand dyed and is actually a medium teal color.  Looking left to right, the first column is plain diamond stitch worked in Caron Watercolours.  The second column is worked to the center from top and bottom with stitches graduating in size horizontally and vertically.  This is two strands of Vicki Clayton's premium silk floss, turquoise. The three small columns of diamonds are used here as filler stitches.  The thread is a variegated cotton floss.  The central portion of the sampler is free stitched to determine how much distortion is possible and to test to see if the diamond stitch could be laid out in a curve.  I think the stitch is far more interesting used in this manner.  The effect here makes me think of a madonna in silhouette; in fact, I left some space above her bent head in case I decide to add a halo, but then I think that can be filled in with imagination.
Two strands of handdyed cotton floss were used for this part.  Another thing I wanted to try was to see if the diamond stitch could be worked horizontally as well as vertically, or if it could be made into a grid.  I couldn't get the stitch to work across, so the final columns show how I did vertical rows, sharing holes between each column.  I introduced two new threads in the final grid section.  The first column is done with two strands of metallic which behaved very well even with the knotting.  The final column on the right is 2mm silk ribbon; it too was manageable.