


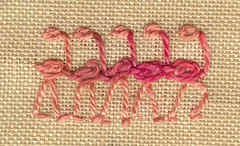
Flamingo Floozies, a slightly out of step chorus line.
Friday, October 29, 2010
TAST 2010 - SPIKED KNOTTED CABLE CHAIN

TAKE A STITCH TUESDAY - WEEK 35
Sharon B describes this as a kind of combination of twisted chain and oyster stitch. It's easy enough to work once you get the hang of it and remember to point and wrap your needle in the right direction. For this sampler I used single strands of Caron's Watercolours and Wildflower. This stitch could be worked in tidy little knots, but I tend to form it loose and plump for the texture. I didn't do much in the range of variation other than alternate spikes and curved & straight lines.
Originally I was working on a geometric pattern, but at some point I glanced down and saw a tree. To convince the viewer it is a tree I added some grass, and here's when I came up with another variation. The final portion of the stitch is worked like buttonhole, so it was easy to add more spikes which I liked a lot. The lowermost grass is two overlapping rows.
There is one more thing I want to do with this stitch. I will attempt it later this week, time permitting.
Friday, October 22, 2010
TAST 2010 - BUTTONHOLED DOUBLE CHAIN

WHERE CREEPIES CRAWL
AND SLITHERIES SLIME!!!!!
When you visit the tutorial for Take a Stitch Tuesday's 34th week, you'll see an example of a nice border. But beware! You can take this interesting stitch to other places. I used a piece of wool felt for the background and let my needle go with perles , #3-#8, or two strands of floss.
I'm thinking Halloween, but see what others are doing here .
Wednesday, October 20, 2010
LESSON ONE - LA FAZIO CLASS
In preparation for Day One, I assembled the supplies I had on hand. These included tubes of watercolor paints over 15 years old and a simple plastic pallet with dried gobs of color. There is no place in my house with good natural light except in my laundry room studio, and it is presently too cluttered to work in. I could have tidied, of course, but then I'd've had to move and find places for all the WIP's sprawled across my tables and dangling from the clothesline then go looking for them when I was ready to resume work on them. I finally decided on the kitchen/diningroom table. It's big and under a good lighting fixture. DH's side is littered with medical and banking stuff, but my side is clear. I like to keep it that way in case I ever have to eat there. Doesn't everybody dine off their laps in the den watching the news?
I download, print and read the lesson several times. Indeed I read it correctly; we are to draw then paint real pieces of fruit. When I'm through cringing, I look for fruit. I have one apple and two bananas.
That'll work. But the rest of my supplies haven't arrived yet. Hallelujah, I'll have to wait until tomorrow!
Next day Joggles comes through with their usual efficiency, promptness, and TLC in shipping. A block of hot pressed, 140 wt paper and a Niji waterbrush arrive in the morning mail. I create a pleasant arrangement of apple and bananas. Today I draw and paint fruit -- as soon as I'm loose enough to work. Nervous tension should dissipate once I get started. Except I have a little more than stress to contend with. If you recall from my last post I'm talking drawing angst.
My upper arms go from drum tight to jelly as I try to get down to business. I can't possibly draw in this physical condition. I'm a wuss, a scaredy cat. I'm chicken excrement.
I thought I would operate in lurk and learn mode. I would read the discussion forums but not participate -- and certainly not show my work. Reading through the intros I was surprised there were others who shared my trepidation but were willing to lay timidness aside in order to learn. Today I will draw and paint fruit...

Teacher! Teacher! My husband ate my homework. Today I will draw and paint fruit. An apple and one banana make an awkward composition, but today I drew and painted fruit. My linework is unsteady, testament to my genuine skittishness. A fellow student posted in the forum that she'd shown her work to lots of people, all of whom said they could tell it was fruit. That's all I could ask from this exercise. My fruit doesn't look good enough to eat, but that's okay. It made a dent in my mental block. The next day I drew and painted an acorn squash.

Our class, Jane LaFazio's Sketchbook and Watercolors Journal Style, is quite large so Jane has opened a Flickr pool if you'd like to see our efforts.
Saturday, October 16, 2010
SKETCHING WITH JANE LA FAZIO
I don't know how to draw! There, I've said it. I feel like a book club member who confesses she's illiterate. I never learned to draw. I know it is an acquired skill that takes careful observation, patience and practice, lots and lots of practice. I don't think I ever wanted to learn (well, there were early issues, but we won't be visiting them), never really thought I needed to learn to draw. I scribbled when I had to and got it over with as quickly as I could.
I began this blog as a journal of my creative endeavors. I took a Joggles class from Sharon Boggan called Studio Journals: A Designers Workhorse. As with any Sharon B enterprise, I highly recommend it. I'm actually still working through the course and have several art journals going and new interests in mixed media and paper arts. Cutting to the chase, these working art journals contain scribblescrawlies where there should be nice sketches. No one will ever see them, but I'd like them to look more, more... artful.
When Joggles published their fall class schedule I discovered this:
Sketchbook & Watercolor: Journal Style with Jane LaFazio.
I took an earlier class from Jane and have been following her blog ever since. She is not only an excellent teacher, she is a gifted and versatile artist. There was no reason for me to have misgivings about the class (except maybe draw-ing!!!!). Every time Jane posted a lovely watercolor sketch with mention that she was preparing for the class I would gasp, then despair, for that is exactly the style I'd like to learn and I have serious doubts about my capability to do so. A few days before Oct 14 I made the decision to register. My shaky finger hovered over the confirm button quite a while before pushing -- a leap of faith moment.
I began this blog as a journal of my creative endeavors. I took a Joggles class from Sharon Boggan called Studio Journals: A Designers Workhorse. As with any Sharon B enterprise, I highly recommend it. I'm actually still working through the course and have several art journals going and new interests in mixed media and paper arts. Cutting to the chase, these working art journals contain scribblescrawlies where there should be nice sketches. No one will ever see them, but I'd like them to look more, more... artful.
When Joggles published their fall class schedule I discovered this:
Sketchbook & Watercolor: Journal Style with Jane LaFazio.
Guess who marked her calendar for the October 14 starting date???
Be inspired to record your life, a special trip, or your daily adventures in a loose, quick journal style format. Jane will guide you through basic drawing, inking and a straight forward intuitive approach to painting with watercolor.
You’ll start with simple objects and progress to vignettes then vistas to draw and paint, and journal your thoughts and impressions on journal size watercolor paper. She’ll encourage you to take a little time to just sit and absorb the beauty around you, sketching and journaling your thoughts impressions right onto the same page.
This 6 lesson class is geared for beginners, but all levels are welcome. Everyone has their own drawing style, just like handwriting, and Jane will help you see and then record that on paper in a friendly, positive and creative way.
I took an earlier class from Jane and have been following her blog ever since. She is not only an excellent teacher, she is a gifted and versatile artist. There was no reason for me to have misgivings about the class (except maybe draw-ing!!!!). Every time Jane posted a lovely watercolor sketch with mention that she was preparing for the class I would gasp, then despair, for that is exactly the style I'd like to learn and I have serious doubts about my capability to do so. A few days before Oct 14 I made the decision to register. My shaky finger hovered over the confirm button quite a while before pushing -- a leap of faith moment.
Thursday, October 14, 2010
TAST 2010 - LOCK STITCH

What I want to know about a stitch are its properties, what it can be made to do beyond the basic. For example, I want to know if its appearance can be altered by manipulating the line or curve, size of stitch components, or giving the stitch a different orientation. Each band in this sampler is a separate experiment. I know the threads I chose make it difficult to see, but this is what I was going for:
Band 1 - The first line is the basic. Foundation stitches are #5 perle and lock weave in #8 perle, different shade. The second line is stitched one background thread below the first and is the same as the first but inverted. Since the space between the two rows is shallow, the scallops that normally occur between thread pairs gives way here to parallel lines. If I allowed greater space between the rows I think I would have opposing scallops as another design option. The closeness of the rows did create a small diamond where the thread pairs meet;
that's where I placed the French knots.
Band 2 - This is probably double lock stitch. I did the weaving top and bottom.
I love the oval/rounded square space that is formed. I suppose it would become oblong if the foundation stitches were longer. I worked a single diagonal stitch in the center with 2mm glitter ribbon. The rest of this band was done with a single strand of Caron's Watercolours, as are all of the following bands except #5.
Band 3 - I simply worked the lock stitch sideways.
Band 4 - You have to look really close to realize here are parallel wavy lines. I know now that the undulation would be more pronounced and more graceful if I placed the foundation stitches closer together in their rows. The different colors are also a distraction from the wave.
Band 5 - I used a skinny rayon cord to make foundation stitches uneven lengths and slightly askew at the top. The result might have been more interesting if I hadn't been so keen on using this really cool rayon boucle yarn that I have so much of because I made a sweater I had to unravel in its entirety because the yarn was so very stretchy. So even though I knew it was too bulky for the size of the stitches I let it stay. I tried desperately to push it down, but it springs back. Color's pretty, though, right?
Band 6 - Working with foundation stitches on the diagonal -- I think this is not the best use of a variegated thread. I also meant to try it with the lock weaving to the center. Another option for later. I get a nice surprise from this band. Can you guess before I tell you further down?
Band 7 - Similar to Band 3, this one is double lock stitch on its side. I used the same thread in both bands, but here I controlled the color.
Here is the sampler on its side so you can see how the stitches look as columns:
 Take another look at Band 5. I spy a column of
Sharon B's tutorial for lock stitch and info about TAST 2010 can be found here, and work by other participants can be found here.
Saturday, October 09, 2010
TAST 2010 - SHELL CHAIN STITCH


After laying down a few gentle curves, I experimented with a spiral and a simple, daisy style flower. The gold rayon ribbon I used to weave as well as working the shell chain. In the detail below you can see another flower with two rounds of shell chain stitch.


Here's a close up of that flower. For the most part in this sampler I used perle cottons, #3 -#8, doubling some for bulkier effect. The gold thread is an inexpensive one I bought on a large tube in a craft store. It doesn't kink like some metallics and is very easy to sew with, although threading it is sometimes another matter.
Thursday, October 07, 2010
TAST 2010 - RAISED CLOSED HERRINGBONE

Take a Stitch Tuesday - Week 31
Let's hear it for the threads! I started in the center with the heaviest of the threads. It is a #3 perle hand dyed in ametrine hues by Jane Van Keulen, a talented New Zealand artist. The final round of tiny leaves and sprigs is hers also, a rayon floss I used double stranded. It has spectacular sheen and variations of russet. The four large coral-orange leaves were made with a single strand of Caron's Watercolours. They are followed with smaller leaves
stitched with a single strand of Stef Francis silk perle. Finally the border uses 2 strands of Caron's Waterlilies and #11 seed beads. The background is Belfast linen.
I was going for a medaillon effect so I found the center of the fabric and basted lines that would divide the work into eights and used those lines to center the leaves. I was able to alter the shape of the leaves by varying the foundation stitches. For example, the two foundation stitches for the largest leaves are the same length, but the reddish ones have a shorter upper stitch. I realized if I began that upper stitch a little off kilter , I could get a slight curve for my leaf tips.
Although my design is symmetrically based, I tried to bring as much variety as I could. I'm well pleased with the different colors and textures and wholeheartedly give credit to the threads! Precision is for charted patterns. I wanted my leaves, while "posed", to still suggest naturalness, and when imperfect stitches occurred I pretty much let them stay.
Don't forget to see what other participants are doing over on Flickr.
Wednesday, October 06, 2010
FREE !!! STITCHING TUTORIALS! FREE!!!
I have been a Sharon B fan for some years now. Still, she never ceases to amaze me with her talent, her energy, her capacity for sharing. She's done it again! Check out her new STITCH FILES. While you're over there on her Pin Tangles blog, subscribe to the feed; great stuff everyday! Bookmark her online Stitch Dictionary, too.
Okay, so you're reading the release info and get to the part where eventually files will be available for sale and you're feeling an aha! Trust me, don't be put off. This is no gimmick. When Sharon puts a price on anything it's a bargain.
Sharon is dedicated to a higher purpose, sharing her knowledge and joy of stitching, design and related arts. I have taken four of Sharon's online courses offered on Joggles. Each class is unique and for me like a semester of study complete with textbook.
If you stitch and adore all things to do with fiber, textiles, fabrics, etc, Stitching Fingers is a must visit!
Subscribe to:
Posts (Atom)
