About Me

Tuesday, March 30, 2010

TAST 2019 - Knotted Buttonhole Stitch


As you see I continued this week's stitch on the same fabric piece as w\Week 4.  I like this stitch because you can work it in just about any direction.  I've used this stitch before, so I did only three things with it this time.  On the left is a green patch where I tried to similate grass using 6 different threads.  I overlapped the rows (working from top to bottom) and made the stems different sizes and working a few of the stitches under previous ones.  The middle section looks kind of chaotic.  What I attempted was to create twigs with the buttonhole stitches worked from either side.  Most of this area was done in #5 perle, but I used a single strand of Watercolours to work a couple of "sprigs" and also the French knots.  On the right is a spiral.  I love how this stitch holds a curve and how the little stems also curve.  I finished early, so I now have plenty of time to practice bullion stitches for next week.
Below is the whole sampler for Weeks 4 and 5.


Monday, March 29, 2010

TAST 2010 - Portuguese Border Stitch


Portuguese Border Stitch
Originally uploaded by Fiberdabbler


Perhaps I should explain the funky background first. I know you would have difficulty recognizing it, but it's from the same sheet fabric and experimental session I talked about in my previous post. I was playing with Dylon cold water dyes. I honestly don't remember if this piece of cloth was used as a rag for clean up or if I was testing colors. Whatever. I rusted the colored results, the ran Shiva paintsticks over a rubbing plate. I found this piece stored with my textured surfaces samples. The lines on it made me think about the spirals and concentric arcs I wanted to try with the challenge stitch. I was thinking about the paintstick lines as a shortcut for marking where I wanted the foundation straight stitches.

I covered the area I planned to stitch with straight stitches following the contours of metallic lines.  I left some of the even stitching bare, as you can see, but hidden below the overweaving are straight stitches of varying length and orientation.  I tried several alternatives weaving over the bars:  1) changing direction from one row to the next; 2) single passes only
(eliminating the second journey); 3) changing direction of the single journeys from row to row; 4) working the two journeys over side by side short stitches instead over one longer base stitch; 5) I tried stairstepping using the two stitches in (4), alternating from one side to the other trying to make a zigzag appearance; I could not get it to work, and 6) weaving or lacing in such a way there is only a single strand look; result -- looks like the rungs were just looped or laced; I couldn't get the same V shape as in the original stitch.

Cotton perles were used and in one instance two strands of floss.  I'm not sure what the variegated boucle is, but it certainly enhanced the texture.  The rows below it were worked with a single strand of Watercolours with very subtle changes.

REALLY LATE HOMEWORK

 A year ago I was happily absorbed in an online class with Linda Monk and Carol McFee.  Please refer to my only public post (there was a wonderful disscussion forum with the class) for a little background and a feel for my obvious exhuberance.  Despite other projects that did get blogged, I never stopped working on my textured surfaces.  I spent happy studio hours until the day before I left for CA for the summer.  I regretted having to leave the work behind and also that Linda's and Carol's incredible book, Stitching the Textured Surface was not yet available.

Last fall I did get the book and downloaded the accompanying online class, a truly exceptional bonus, but have not had time to get back in the groove.  What I'm going to show are experimental samples.  The mediums and background treatments are recorded in a notebook.  It's the notes I was after to work on a mullti med  project for , yes, another class I'm presently taking, Kimono Collage with Jane LaFazio.  More about that in the next post.

You can see all of the samples with brief descriptions here on my Flickr site in the Textured Surfaces set.

Thursday, March 25, 2010

RED CABBAGE CONFESSIONS

 I met DH to be in the Tuborg Brewery in Copenhagen where he rescued me from the unsolicited attentions of a Tunesian pilot.   What really made him my hero, though, was a footlong hot dog smothered with red cabbage!  He bought me all I could eat at a little stand in the Danish countryside.  He and his brother and I glutted ourselves and still revel in the memory of that simple treat.
Above are samples from my Quilt U dyeing class, using different mordants with a red cabbage brew.  I dyed linen, PFD muslin, cheesecloth, silk ribbon and perle floss, and in the middle right side there is rayon ribbon.
I have another half a cabbage in the fridge, and yesterday I purchased European style footlongs!  ;-)

I could not resist playing more with saffron.  I began soaking the samples above in the leftover saffron brew from earlier, but only got the palest hint of yellow, so I added a pinch of tumeric to kick it up.  Here I've got cheesecloth, muslin, linen, raw silk, silk ribbon, and cotton perle.
Here the blah results of my blueberry tests.  They are drabber and grayer than shown.

Okay, a couple more confessions.  Only starving university students are likely to order fried eggs with roasted potatoes and red cabbage -- had to have been a lunch special at a neighborhood Gasthaus.  My friend (come to think of it, she was one of my female cohorts in Copenhagen) and I were enjoying the meal when we noticed something blue on our plates.  Mold?  We sent the meals back to the kitchen , but after a few bites discovered more bluey purple splotches.  We complained again.  This time the cook came out and
mixed the red cabbage with the egg white.  We finished our blue eggs.  Mmmm.

I once tumped a full crockpot over in my car.  Clean up was laborious, messy and stinky.  I know you've already guess what was in the pot.  Yes, sweet and sour red cabbage!  BTW, I used to make it with red wine vinegar and currant jelly.

Wednesday, March 24, 2010

TAST 2010 - BEADED HEDEBO EDGE


This week's sampler is worked on hand dyed fabric (Cashel?) with DMC pearl cotton.  Blue beads are #6 seed; the yellow are cubes.  The fargo rose uses 7mm silk ribbon that I recently dyed with saffron.  As we are encouraged to do in the TAST challenge, I looked for different or less obvious ways to utilize the given stitch. 

In the first row I was trying to see first if the curve could be worked in or out.  It can, but you may have to change direction if you can't work the stitch backward.  Next I wanted to see if  it could be linked by shape.
When I finished the "squares" , I realized I had created little frames which shouted to be filled.  Since the sides lay loose on the surface, I thought additional weaving or lacing could be done easily.  In the left square I used a simple dove's eye as might be worked in a hardanger kloster, and on the right I wove spokes.  My rose looks a little naked in the center.  I remember now that  I had originally planned to attempt my initial, N, which could be easily rendered with three lengths of edging.

The second row began as an experiment to see if two edges could be woven between the beads.  They can, but I left the second strands bare as a contrast.

The last segment is always my favorite to try.  What happens if I distort?  In this case I made the foundation cross stitches irregular in size, length and direction.  Voila!  Abstraction.


Saturday, March 13, 2010

TAST 2010 - KNOTTED LOOP STITCH


The knotted loop stitch is fun to work and offers far more possibilities than what I've stitched here.  Be sure to see the border and stacked examples Sharon B shows on her Pin Tangle website along with the tutorial on how to do this stitch.  Basically it is two straight stitches, upper and lower, combined with a knot

My background is a piece of craft felt with metallic threads that I've dyed and then overdyed with rust.  My fish (silk & wool yarn) shows the usual center placement of the knot.  So does the centipede to the right.
The fun thing is the knot can follow a curved line beautifully, yet the line can appear more to the top or bottom depended on the length of of stitch above and below, as with the bottom centipede.  It creates a kind of spine.  I managed a small spiral, and tried to make concentric circles.  With the "fossil" in the upper left, I tried to skew the stitches every which way.  Even though I varied the length and spacing of the straight stitches, the "spine" is still evident, just not as knobby.  Incidentally the other threads used on the sampler are a gold perle cotton and Caron Watercolours and Wildflowers in the same colorway.

Do look at Sharon's samples.  She shows a thick and thin border , filler possibilities, and flowers!  There is a Take a Stitch Tuesday group on Flickr if you'd like to see amazing work by global participants.

Tuesday, March 09, 2010

TAST 2 - DIAMOND STITCH

The diamond stitch is a knotted stitch, and I wasn't able to do much with it.  The background is hand dyed and is actually a medium teal color.  Looking left to right, the first column is plain diamond stitch worked in Caron Watercolours.  The second column is worked to the center from top and bottom with stitches graduating in size horizontally and vertically.  This is two strands of Vicki Clayton's premium silk floss, turquoise. The three small columns of diamonds are used here as filler stitches.  The thread is a variegated cotton floss.  The central portion of the sampler is free stitched to determine how much distortion is possible and to test to see if the diamond stitch could be laid out in a curve.  I think the stitch is far more interesting used in this manner.  The effect here makes me think of a madonna in silhouette; in fact, I left some space above her bent head in case I decide to add a halo, but then I think that can be filled in with imagination.
Two strands of handdyed cotton floss were used for this part.  Another thing I wanted to try was to see if the diamond stitch could be worked horizontally as well as vertically, or if it could be made into a grid.  I couldn't get the stitch to work across, so the final columns show how I did vertical rows, sharing holes between each column.  I introduced two new threads in the final grid section.  The first column is done with two strands of metallic which behaved very well even with the knotting.  The final column on the right is 2mm silk ribbon; it too was manageable.

CORAL BELLS, GERANIUMS & RETURN OF THE FLAMINGO FLOOZY!

I am ecstatic!  Coral is one of my signature colors; I wear it well -- in moderation, more about that later -- and I love to use it in my art.  It was purely accidental that I came up with the coral of my dreams in a what-the-heck experiment.  I must credit my teacher, Marjie McWilliams, for encouraging us to be daring.  She virtually yanked me from my cowering corner double dog dared me to try whatever concoction I fancied.
In other words, clean out those kitchen cupboards and play! 
So I find a dust covered bottle of DeKuyper's Wild Strawberry Liqueur.  It's been hiding for 15, 20 years -- I remember why I even had it in the first place, but it's well aged now.  The color is pretty, so I try it out on a small piece of cotton.  After an hour it has an unappealing color, an unpretty amber.  What if I added a few drops of red food coloring?  Turns out the only liquid coloring I had was green.  What I did discover hiding further back in the same cabinet were jars of food coloring pastes from a cake decorating class I took a decade or so ago.  I kept adding small amounts of red paste until I thought I had a strong color.
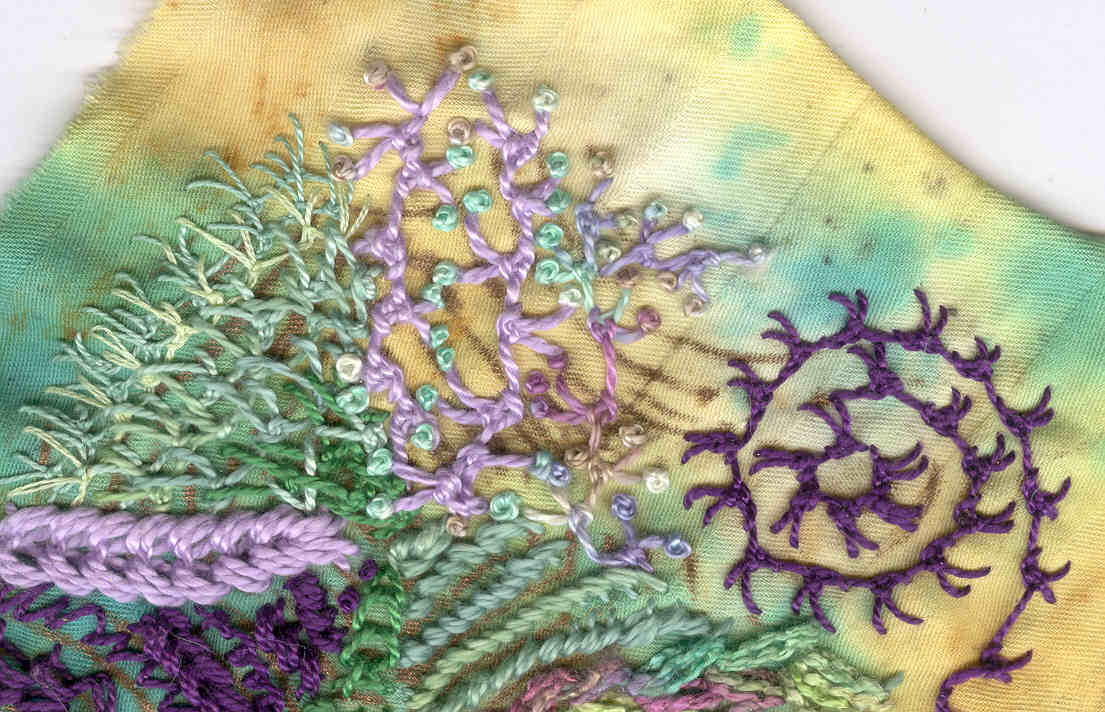
It's not red;   the cotton is a pretty peach , but the silk ribbon is nice shade of brick or russety red, rather different than appears in the above picture or below.  I liked the ribbon color so much I decided to do a larger batch.  I pulled it from its wild strawberry bath after soaking half the time, and then came my Eureka moment and the yummiest coral shade ever! 

It is a shame the scanner isn't picking up the vividness of the color.  Oh, my feet are still happy dancing.  I have to wear coral sparingly, usually as an accent color.  Otherwise it is far too attention-getting, and I don't always want to stand out.  Let me put it this way.  I once wore a coral cape while walking down a San Francisco street.  I suddenly heard my name called out; a colleague from Kentucky who had no idea I was even in CA spotted me.  I have a lovely silk outfit of this same coral .  I only wore it once.  People stared, but I think it was because I looked more like the Mango character from Saturday Night Live -- only rotund.
Instead of feeling fabulously flambuoyant, I felt conspicuous.  Another occasion, another attitude, I could pull it off;  my alter ego could shine as the Flamingo Floozy.

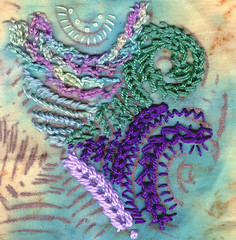
Not every experiment gets me worked up.  Above are a couple of duds.  The top is beet juice; most of the color rinsed out, and rest disappeared with the mordant soaks.  The dirty yellow comes from doubled strength peppermint tea and the addition of dried mint.  I was hoping at least for a greenish yellow, and I'd so hoped for little tiny spreckles of darker color from the mint leaf flakes.

Sunday, March 07, 2010

SPICING IT UP!

Lesson 2 with Marjie McMcWilliams at Quilt University, dyeing with spices and juices.  It took me a while to conduct all the tests I wanted because I only have 2 burners on my stove; however, since I was using saucepans instead of cups as I did with the tea dying, I was able to dye larger pieces of cotton and a yard or so of silk ribbon for each batch.  My results were well worth the patience.  I was thrilled with the silk ribbon, and I look forward to playing more in the future.  Not shown are the unsatisfactory outcomes of beet juice (from canned beets) and mint tea steeped with additional dried mint.  It's a shame the colors in these pix aren't as bright or appealing as actual fabrics.
Top to bottom:  chili powder; paprika; Goya Sazon, dry mustard
Top to bottom:  tumeric; curry; saffron 2, saffron 1

Grape Koolaid.  What's looking gray in the picture is actually lovely shades of purple.  With the silk ribbon left in the solution from 5 min to an hour  I got 3 values, pale lavender to deep purple.  The feather and eggshell got about 15 minutes.  The cover of my scanner crushed the egg shell, but it doesn't matter because I use the shells crushed anyway.  Note the cotton remained pink -- about the same I got with beet juice, but the latter wasn't very colorfast.

Wednesday, March 03, 2010

DYEING WITH TEAS AND SPICES

I am in Week Two of an online class at Quilt University.  It is "Dyeing with Tea and Spices" with Marjie McWilliams.  My kitchen has been converted into a laboratory, as I concoct dyeing solutions from various teas and mordants.  Except for the controlled experiments I've been conducting, I could be the mad scientist I always wanted to become.  DH is overwhelmed by the absence of countertops and sitdown meals.  He thinks I'm done because I've completed my initial tea experiments.  He has no clue that I've turned to spices, juices and other foodstuffs.  The showdown will come when I start cooking the red cabbage, one of his favorites and something I seldom make for him!  I'd best cook extra, I think.

Last week I worked with 11 teas and followed the protocols provided in the lessons.  I dyed strips of PFD cotton and small lengths of silk ribbon and ended up with 6 swatches for each tea.  The experiments involved length of soaking time , vinegar as mordant, alum as mordant.


 Before tossing the tea solutions I tried dyeing egg shells, feathers, coffee filters, rice paper plus one other exotic paper laced with twiggy fiber that really soaked up the color. 

 I also dabbed each tea onto a piece of watercolor paper to see how it would look as a wash or stain.  I've saved the tea bags; I want to try dampening them and pouncing them on paper to see what happens.  I did this once with coffee.

TRANSFORMATIVE DOLLMAKING

The Transformative Dollmaking class with Pamela Hastings concluded this past week.  I only completed the first doll, but I have Pamela's thought-provoking lessons with wonderful patterns and ideas plus a class notebook  bulging with concepts and sketches for future dolls.  This amazing class encouraged further study and exploration with each chapter and much introspection.  So much more than how to make a doll!  I highly recommend it for anyone interested in healing dolls and creative therapy.
Above are freehand cut patterns for possible chakra dolls.  I kind of liked the way they looked together so I'm considering a future project in fabric or mixed media.  Another project I did for the class that is almost finished is a collage with a time theme (one of the things I get conflicted about is productive use of time). 

Tuesday, March 02, 2010

TAST 2

Here we go with TAST 2.  Each Tuesday for a year we will be getting a stitch from Sharon Boggan to play with.  Don't miss out!!!

You can see my work from TAST 1 here and what others have done here.