About Me

Friday, May 28, 2010

TAST 2010 - RAISED CUP STITCH

OMG is that background what I think it is?  It is if you're thinking towel!  I made a batch of Earl Grey tea stain the other day and couldn't just pour the leftover down the drain.  What was handy was a threadbare dish, er, tea towel I'd used as a blotter from my last dye session.  "I wonder what it would be like to stitch on?", I mused as I stuffed it into the Pyrex measuring cup that held the tea.  As soon as the towel was rinsed and dried I found out.

I finished Week 12 early, so I was happy to keep my fingers from wriggling in anticipation of  Monday Night and the latest TAST temptation.  I worried (not really, this was a rag!) about embroidery needles and sharp points catching on  tiny, terry loops, but since the velour finish had long ago worn away from the printed front side, the fabric was very giving and yielded to my large tapestry/yarn needles with ease.  For this sampler I ended up using only #5 perle cottons and fingering weight wool/silk yarns.

About 2/3's down I started a line of twisted chain.  I wanted a little more height so I layered a second row right on top. You can see I got much better dimension with yarn seen in the single layer of twisted chain below (brown).  The gray line is knotted buttonhole stitch threaded with a piece shiny raffia, probably something that once tied up a package.  Seems like I had just gotten down that charcoal line of Sorbello than twas time to download Week 13, Raised Cup Stitch!  Am I the only one who has a pavlovian response to Sharon B's challenge posts?

I got all of those raised cups stitched waiting in a doctor's office for DH.  They are all worked with the silk & wool yarns.  I love their organic shapes, how they flop and smoosh together.  The white one in the center  is an example of decreasing to make the cup turn inward.  The coppery bit you see are "stamens" emanating from a French knot.  I added irregular cretan stitching awaiting DH's lab work the next day, routine medical, btw.  I was satisfied that that finished the upper portion, but had to experiment a bit to get the rest as you see below.
I tried couching down some pussy willow yarn, had a little spiral going, but the color seemed to light.  I made it worse by weaving in a darker yarn.  Ugh.  Check out the raised cup centers, wooden and agate beads too big, faux pewter spacer beads.  No, no, no.  Too fussy.  Not in keeping with the rustic look I wanted.

What was I thinking?  That thing ,btw, is a freeform crocheted motif that's been waiting around forever to unite with its  kind to become a scrumble.

So I end up with unfilled cups and graduated French knots on the bottom.  Swapped out some of the beads in the other row with French knots --  and
a bullion (white cup on the left!).

And now a sort of tutorial.  Working the raised cup stitch reminded me of a motif I learned a few years back on the CQ Embellishers forum.  I was thrilled to make it, especially since I hadn't learned any fancy stitches.  The other Embelles used this effectively as sea anenomes in some of their wonderful underwater fantasies.  The motif is so simple, it really doesn't require illustration.

Thread a tapestry needle with yarn or chunky thread.  I find this easiest to do on my left index or little finger, but a pencil could be used instead.   Begin at the top finger joint and wrap the yarn upwards about four times, covering the tail as you go.  Wraps should be loose enough for you to work the needle underneath.  Pass the needle downwards behind the wraps, holding the top coil with another finger.  Now work around buttonhole stitch around, pushing the
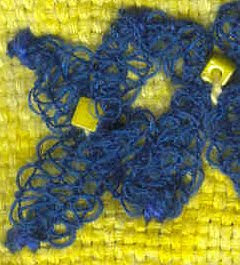
stitches close together.  When the round is completed, weave in the end.  You now have a little ring motif you can stitch to your work and embellish with beads.  I used to like to make these using a funky variegated yarn, sparkly and frizzy.  They can also be used to make little nests as in the example below

This is from my project for Sharon Boggan's Encrusted Crazy Quilting class.  If  you haven't tried one her courses, you do not know what you're missing.  They are outstanding and comparable to a semester of study complete with textbook. 
Thursday, May 20, 2010

TAST 2010 - SORBELLO

I've become a real fan of knotted stitches for the extra texture they provide.   Sharon B gave us beautiful examples of Week 12's Sorbello stitch, which makes interesting patterns when used in repeats and presents itself nicely for the addition of bead embellishment.  She had one example of the stitches worked densely together as a filler, and she varied a thread or two adding color and textural variety.  I really liked the appearance, but I didn't want to copy her application.  I chose to apply a similar version as a border.  My stitches are more open, and I used a single variegated thread (Watercolours, one strand).
It's dense and textured enough, though, that glancing at the actual cloth, the stitching almost looks like crochet or chunky cotton lace.

My next variation was going to be a line of elongated stitch alternating high and low positions of the knot.  I discovered it was easy enough to work side by side stitches this way by varying the tension of the first part of the stitch .  When I went to work it on my sampler, I decided to do it in two passes, working the upper knotted stitches and leaving spaces for the lower knotted ones to be filled in afterward.  Using a single strand of a different Watercolour thread, the stitches were too dense.  Too many threads made the line too busy and the high-low knot effect got lost.  I'll try the technique another time, maybe even experiment with alternating colors.

After removing the second pass (lower knotted) stitches, I decided I liked the spacing, which led me to place the lower knotted stitches directly below their counterparts, creating a nice diamond in the negative space (perfect for a seed bead or French knot?).  To me the obvious next move was to at least partially fill the spaces between the stitches and balance the high-low with a centered knot at the join line.  For this I used 2 strands of hand dyed cotton floss that matched the deeper colors of my border thread.

At this point I realized my remaining stitching space was limited; spirals, curves and the like would have to wait for another project.  I opted to repeat the first two rows.  This repetition gave me another the appearance of little circles (a skinnier thread would have produced little diamonds).  Nice.  I could have left the sampler alone at this juncture, but something else was needed to fill the void between stitches of the center two rows.  I thought X's  like I did in the other rows would crowd and distract from the little O's.  I didn't want to introduce a new thread either.  I took a single strand of the floss and made the elongated, center knotted X's.  I like the look.  The background space is filled but subtly.  There is certainly room still for beads and French knots, but I'm going to let that go -- for now.


Sunday, May 16, 2010

TAST 2010: BULLION BUTTONHOLE

The stitch for the 11th week of our Take a Stitch Tuesday challenge is suitable for a variety of applications.   In terms of CQ seam treatment, I doubt it can be beat in its potential for embellishment since the combinations of stitch variations with sequins, beads, ribbons, buttons, charms and other threads seem limitless.  The bullions (and mine are hardly exemplary) require time and patience but are so worth the effort.

I used a piece of Procion dyed Aida and worked my samples as they might appear over a seam, but certainly they provide enough interest and texture to be included in a contemporary embroidery project.  In the first row I used #12 silk perle from Vikki Clayton; I've had this for some years and I doubt she stocks it anymore.  I worked the buttonhole upwards and downwards in one pass.  I varied the height of the bullions but kept the variations symmetrical.  I left spacing for additional embellishment like buttons or flower beads, but I opted to try a little SRE, a loose French knot (aka Montano knot) and a petal.  I filled all the spaces but it was too much, and you can see where I didn't take time to scratch over the stitch holes.  On reflection I deem the SRE here out of proportion with the more delicate stitch size.  A poor choice, but I just wanted to get an idea.  For the record, all the bullions were straight; several got ruffled though when I removed the silk ribbon stitching.  I actually like a version that would be more relaxed with some of the bullions drooping, not sloppy, just an occasional irregularity.
 The second element is comprised of two rows of bullion buttonhole worked close together and then laced with a decorative cord.  Space is left between the bars of bullion for additional embellishment.  Ribbon or some other thread or yarn could easly be threaded under those bars.  The basic thread here and in the next pattern are both single strands of Caron Watercolours.  I'll talk about the cord in a minute. I wanted to add, I really like the way some of the bullion clusters nestle and curve together.  Another time I would try to make them all appear like that, a softer, less rigid look.

The final section is again two rows worked in a curve with a little more space between them.  I thought a line of beads worked as a center row would be pretty.  You're surely aware that were this to be a finished decorative project I'd probably have beads all over the place, especially crowning those bullions.
What I did instead is run the cord under the bullion rows, and it's a shame it's not showing up that well because it is a sublime thread!

Glitter cord it's called, and I found it in a fiber art store in Christ Church , NZ.
I bought a couple of skeins and hoarded them until recently when I discovered I could purchase more and so much more directly from the artist, Jane Van Keulen.  When you visit her website, take time to peruse her gallery and see her lovely work.  Back to the Glitter cord.  Jane's colorwork is scrumptious.  That alone would be enough, but this cord has additional properties of being soft and almost sensuously slinky the way it drapes over hand and fingers.  It's too bad the sparkle doesn't show up in these pix. 

Saturday, May 08, 2010

TAST 2010 - CLOUD FILLING

I found this Week 10's stitch could be light and airy, make a linear statement of its own, a wonderful seam treatment with unlimited possibilities for embellishment.  This little sampler was stitched on a piece of woven raw silk, very burlap-looking, that I dyed with saffron for a recent class at Quilt University with Marjie McWilliams.


I really liked the way Row 1 turned out.  I made the foundation bars with two side by side stitches, but because of the looseness and irregularity of the background weave it looks like I stitched little v's. For the first layer of lacing I used #5 perle in yellow, and because it doesn't stand out on its own, I added a second layer by lacing through the center bars only and going under the background thread directly below the top bars and above the bottom bars.  The result is like a row of spiders, and I think I'm going to have to file this idea away for a future CQ or Halloween project.                                                    The detail to the right shows how I vertically worked this next segment  .  Obviously it was a waste of time because the stitching looks the same on its side!  Two strands of metallic floss were used for lacing.  The sparkle seems to have gotten lost.  Below left is a closeup of the lace yarn I used.  If I pulled it taut I would just have a line of navy; however, the looseness and ease of the yarn made it possible for me to pouf  it  out.  If this section looks uneven, it is.  I laid out the foundation bars in a gentle wave.  The the rows of stitching are parallel, so the lacing follows the undulation.  A less bulky yarn would have shown this better.      The fourth segment is an experiment that didn't work for me here with my choice of lacing yarn, a tweed, cabled cotton in a heavy worsted weight.  My plan began with the base of detached chains with the tack-down stitches pointing inwards to accomodate a  second lacing.  Nothing I had on hand provided enough contrast, so I left it bare, and although it begs for further embellishment in the center, you can see the design I was going for with the graduated spacing of upper and bottom chain stitches.  Here the center anchors are beads which stay in a straight line unlike the beads in the previous section which parallel the top and  bottom rows.
The final section of the sampler shows top and bottom row anchors as bullion stitches.  I am definitely not proud of these.  They have a rather gnarly appearance mainly because of insuffienct wraps.  I used beads again for the center row.  I would have used them to help camoflauge or tidy up the bad bullions, but I didn't want to waste the beads.  Lesson learned.                                                       

Monday, May 03, 2010

TAST 2010 - RAISED HERRINGBONE BAND

For these weekly studies I rarely plan a design first.  If the stitch is new to me, I practice the basics on a doodlecloth .  When I can grasp the mechanics of the stitch, I don my thinking cap then may or  may not scribble down  the variations I come up with.  From  this point I pretty much work spontaneously, although I do strive for a reasonably balanced composition.   I'm no stranger to the frog pond.  Sometimes experiments fail or need to be further modified.
  
This stitch was somewhat deceptive in that it changed with each layer. Combinations of threads and yarns I thought would work, didn't always.
I started with scraps of onion skin dyed Aida and cheesecloth.  I think scrappy, shabby and rough were in the back of my mind.  Generally I begin with what I deem will be the largest of stitch elements.  In this case it's the shaggy diagonal.
Instead of a satin stitched foundation I used a piece of oversized,  faux suede ric-rac.  I centered the herringbone over the zigs and zags and then wove in the chenille yarn.  Next was the light blue diagonal in #8 perle.  The herringbone is worked in silk/wool yarn, and the lacing is cotton suede.  I used the same yarn for the satin stitches on the curvy diagonal that intersects the ric-rac bar.  This element was intended to show curves and irregular foundation width.  Blue herringbone with French knots are two strands of cotton floss which is then woven with a strand of Vikki Clayton's silk perle from her dragon series.  I don't know if she still produces this color, but it's been one of my faves and now I'm out of it because I used it liberally throughout this sampler.  You can see it clearly in the unembellished, uneven satin diagonal in the lower left and echoed in the two vertical curves of satin foundation on either side of the big spiral.  Those two have cotton perle (#10 or#12) herringbone and then laced with strands of eyelash yarn (those are the brown strings you see in the picture, some of which are copper metallic).  What's really neat, to me, is the way the lashes arch and hang over adding a third dimension to the sampler.  A shame that effect doesn't show up in the scan (how could it, the lashes are all smooshed down!).  I later worked the same dragon perle as a running stitch border line before fringing the background fabric.

The large spiral is worked in Caron watercolours .  It stands "naked" because nothing I tried worked over it to my liking.  Ditto its counterpoint circle in the lower right.  This leaves the, um, motif in the upper right.  The horizontal brown bars are #8 cotton perle, as are the vertical blue ones.  Just for fun I wove one of the intersections.  Herringbone is worked over and beyond the horizontal bars in Caron wildflowers (same color as the spirals) and laced with an elastic  cotton yarn that's nubby with metallic copper flecks.

I encourage readers to discover how other participants explore the  TAST2010 stitches.  Please visit our Flickr  group site.


Saturday, May 01, 2010

HAPPY DERBY DAY

My daughter cruelly emailed this picture of the Derby style pies she made.  She is in New Jersey, so I won't get to partake.  I will not be eating Derby Pie, Pegasus Pie or any other Derbytime treat today.  The party to which we were invited is an outdoor affair, and if you're watching Derby coverage on TV as we are, you know it is wet, chilly, and generally yechy weatherwise here in the Bluegrass.
At any rate, we are still of good cheer and wish everyone "Happy Derby!"  May your pick horse win!!
I'll share a little local culture for you.  Derby Pie is a trademark name protecting a proprietary recipe, but just about everyone who bakes in these parts has their own version.  Original Derby Pie is a like a pecan pie with walnuts and chocolate chips.  I have two fave versions and both use pecans; one includes a hint of bourbon.  To me the pies cannot be served without whipped cream.  Btw, I will share my recipes freely, just ask.