About Me

Thursday, December 07, 2006

DOODLES


For Week 5 I ended up just doodling. Shouldn't say just doodling, for every doodle is a learning experience; some are just more aesthetic than others.
I began with a piece I started earlier when we were practicing the guilloche stitch. I wanted to play with different post combinations. I never went back to it because I hated the linen and the
stitches turned out bigger than I wanted to pursue. I returned to this sampler to study shapes
and tried filling the negative space with different things. I have a difficult working on this fine a count, and if I want to do a nice job I have to use magnification. I've tried different magnifiers, but all are awkward, so I'm going to convince my opthamologist to create a pair of stitching glasses for me.
The second doodle is on a 25 ct lugana. I was pleased with the look of the close spaced cretan stitch. I found that if I wanted to keep the knotted line even, it was best to work with a drawn line first. I like this stitch even when it is a bit rugged, wherein the center line and the length of the stitches aren't quite even.
Last doodle is on a piece of wool that I fulled in the washing machine. It looks dirty because I must have thrown it in with darker fabrics that added their lint to it. I'll have to remember to try treating it with one of those masking tape rollers or shaving it when I get around to buying a cheap electric razor just for that purpose. I played with fronds until the rayon thread became to unruly for my patience level. I wanted to see how the close spaced cretan would do as a tree trunk (didn't care for it). Then I wanted to try the up and down cretan for grass. I used 3 layers of stitching with different colors, but I think it needs more experimentation to work. I also tried a small area with 2 strands of different color.
Week 5 gave me lots new to use and even more ideas to try. I'm only sorry for not having prettier homework to show.

Sunday, December 03, 2006

ANOTHER NEW TOY!!!!!

This just in from a knitting list. A design tool for generating stripes which allows you to pick your colors and stripe size and, well, another toy to play with. All these gadgets are bringing new meaning to Tool Time! The stripe maker is so cool. You enter as many colors and as many stripe widths for as many rows as you want, and if you don't like the arrangement, simply refresh the page and a new version will pop up. You can also save your versions.

Saturday, December 02, 2006

DENSITY AND DIFFUSION


Here's another sampler I did for Week 4. I did some dense line stitching on the bias and then tried to diffuse or lighten the stitching in two of the corners. This is not supposed to be anything. It needs a border. The colors do not show up well in this picture; they are prettier on the cloth
(25 ct Lugana), trust me, and I see some of the stitches disappear into the background, so some of the detail is lost. I deliberately used tone on tone in the lower right as part of the illusion of fading.

I have really come to appreciate the knotted stitches and am happy to be adding them to my repetoire. I love the additional texture they provide. BTW, the focal bead (I had originally sketched in more to bring curves to my diagonal lines, but they were too heavy and too much for such a small piece
--pc size) also reads copper depending on which way it captures the light. You can see where the other beads might have gone. In the soft aqua bulge I substituted a spiral of feathered yarn.
Above that in the teal section is a cluster of French knots. They are done in 3 different fibers, but you just can't see them in this picture. On the upper side (I started stitching on the center diagonal and did one half at a time) I used a heavy boucle yarn to put space between the solid lines. I've reached the conclusion orientation is everything. I don't like the horizontal presentation anymore...

SAMPLER THROUGH LESSON 4


Stitching is complete on this sampler which takes me through the fourth week. I still plan to add seed beads here and there , nothing garish, just occasional highlights. The mirrored fly stitch in the 4th band reminds me of a school of Escher fish, so they're just going to have to have seed bead eyes, maybe something sparkly on the fins.

The last five rows of the sampler are the ones added this past week.
There's arrow or zigzag with 3 strands of color, the feather stitch variation that I truly love, always so graceful, here making me think of pine boughs. Next is ribbon couched with chevron , the a row of knotted fly, and finally 2 interlocked rows of knotted buttonhole,
the centers definitely needing beads.

I will probably add to the border eventually. This is a sampler in the true sense that I used it to practice stitches and combos.
I did not keep accurate thread counts or plan a row, just guestimated the spacing. Still I like it with its imperfections enough to want to give it a finished look.

Monday, November 27, 2006

SAMPLER THROUGH LESSON 3

I have thoroughly enjoyed working on this sampler. This palette is very soothing. I have space left for another week, and then I will have to begin another. I allowed myself a bit of whimsy and broke format with one of the bands. I'm tempted to add little tongues, but I don't really like the eyes that well and may remove them and let the stitching be suggestive enough. Tell me what you think.

Here is the description of last week's stitches:
3rd lesson begins with teal floss herringbone added to the last line from Week 2.
2 rows of cable chain, both in pearl cotton
1 row shallow herringbone in hemp.
Next row has slinky yarn couched and laced (look closely!).
Turquoise row of twisted chain.
Butterfly chain.
Knotted cable chain in Watercolors (green tea is the color).
Double cretan with straight stitches in pearl.
Running stitches in copper metallic yarn (this area is not finished).
Finally crested chain in #5 pearl.

FLOWER POWER -- EEEEEEK! RUN!

Run fast! Run for your lives! A lilac creature is in pursuit of my flowers. Looks like a flower child had a bad trip. I should call this "Why I never dropped acid!" Oops. Sorry. The picture should be oriented this way:


On the other hand, this way looks just as chaotic and just about as scary. I could call it "Nightmare at Haight-Ashbury. This is a sampler I started during week 2 of Sharon's class, the lesson about point. I started with the 3 butterflies -- geesh, can you even find them? Then I wanted to practice some different flower techniques. Imagine my surprise when the first turned out like a gods-eye (more flashback: tie died tees, macrame...). I tried to disguise it with more petals, and the shape got away from me. Added some straight stitches to give it more body, and there you have it, the square flower, a horticultural miracle. Perhaps I shouldn't say, but I actually liked its tranformation as a primitive weaving.

One of the other big flowers is rather tribal-looking, too. I would have been happier had the center been more round, but I realize the number of spokes plays a major role. I skipped the weaving on the the third large flower , then continued playing with the wrapped and woven thread technique on the smaller flowers. I especially liked the star flower with the woven petals, and I liked the boucle effect produced by less than consistent wraps around individual threads in the upper right hand corner. I was ravaged by guilt working this technique, knowing I have 13 more woven and wrapped motifs still to do for my Options in Hardanger class.

I have no idea why I kept going at the sampler, except I wanted to see where the point concept would bring me. In the back of my mind I envisioned seed beaded paths interspersed in barer areas with cascades of tiny buttons and bead assortments. While I love the practicality of the postcard size sampler, it can be creatively limiting -- no wait, I forgot about the purple doodle that ran rampant and morphed into an oversized K (my married surname? Granddaughters Kaitlyn and Kellye? My grandmother Kathryn aka Kay?) and hogged at least a third of working space.

Why did I keep going? Well, we are supposed to be exploring and experimenting. I just wanted to see if I could pull off a visually balanced piece. My conclusion is there is too much clutter and lack of unity. The stitching did not have my full attention and it definitely shows. Still it was a fun exercise in which I could relax and do whatever. Another plus for the postcard format.

And just so you know, while I was born and raised in the San Francisco Bay Area, I was too young to be a Beatnik and too old to be a Hippie.

Saturday, November 18, 2006

MORE TO THE POINT!


Contemporary Australian fabric representing aboriginal dot painting. Here points are used to outline and isolate images (flowers, leaves, ant/termite hill). Concentration of dots represent specific things symbolically like desert, river, swamps, giving geographical clues to rendered environment. Although the larger circles are placed symmetrically, the bugs are arranged randomly and strongly emphasize movement. Simarlarly the leaves, if that's what they are, seem to signify direction, which to my interpretation is circuituitous.

Inspiration for this fabric comes from molas, colorful applique created by the Kuna women of the San Blas islands of Panama.
The playful dots in the background create movement and make the eye rove around to the various mola type animals, which are points in themselves and arranged in a way to bring movement to the entire pattern.


Big dots and little dots. Background dots move and alter shape of

foreground circles.

Dots as beads, arranged to create the appearance of Native American bead weaving. On the other hand it could simply come from a photograph of beads embroidered into Indian motifs on a black cloth. No matter, the images are a mosaic of points; each dot is a component of the greater picture -- rather like pixels!

I see bright dots orbiting around poles. No, wait, the poles with their satellites are moving in a dimensional wave. Definitely motion, most definitely an optical illusion. Somehow the notion of this fabric made into a tie or a shirt or a dress is rather scary. My grandmother gave me such a skirt once -- and it waaa-ay before the sixties.
A skirt that plays with people's minds; could explain a lot about how other kids responded to me as a child. Or now, when I confess I really, really like this fabric and am going to have to splurge on at least a fat quarter!


Another nice study of patterned points. And although this print is more subdued than the one above, it too is contrived to create illusions. The more you look, the more you see. Besides in and out movement, there are secondary designs like the one created in the negative space between the big dots. Once you see them they become points themselves. And just what is it that creates the effect of colored stripes? Background color, right? Does it make your head hurt to try to discern precisely where the stripes are? I think it's a wonderful design , and I can see its application to stitchery. But I wouldn't want to wear it. I wouldn't want it on my bedroom walls.

Man has always fixated on points in the night sky. My guess is that was probably the earliest version of follow-the-dots. I think most cultures incorporated constellations into their folklore. I am only able to recognize the Big and Little Dippers (Ursa Major and Minor) and that great trapezoid in the sky, the Southern Cross . I cannot identify other celestial clusters, probably because the dots have no numbers to guide me from one to the next. I worked a lot this summer on a fulled wool CQ block with tribal themes from the Pacific Northwest. One of the motifs I've planned includes the bear constellations, so I bookmarked some sites that showed them outlined.

TO THE POINT!

Part of our ongoing homework in Sharon B's Personal Library of Stitches class is to look for examples of point and line in design. Our teacher referenced some awesome examples of point
beginning with the obvious, Seurat's pointilism. In looking for additional links I came upon
The Pointilism Practice Page that teaches the concept behind the technique with an interactive tool that allows one to create dots of many sizes and colors and work them on a virtual canvas.
I immediately bookmarked the site for use as yet another color and design tool. There are also tools for palette painting like Van Gogh and or Japanese brush painting (kind of like Etch-a-Sketch gone Zen).

You know, I think I came upon this site serendipitously, as I googled pointilism rather than the possibly more common pointillism. The second listing in this search brought me to State of Entropy and a tutorial for pointilizing a photograh. Looking at the step by step, digital transformation of the Statue of Liberty make Seurat, Paul Signac and Pop Art seriography so old school in terms of time and mess. It's all so, so pixilating.

Speaking of old school, as in ancient, Sharon introduced us to Australia's aboriginal dot painting and its contemporary renderings by artists like Eddy Harris . I have always been drawn to primitive and ethnic art, but these dot paintings just shot to the top my faves list, especially after viewing another gallery site which provides even more eye candy including painted emu eggs!

When I first read the lesson part about seeking points, I immediately thought of Nancy Eha's Jungle Rhythym, a beaded art quilt I first saw on Simply Quilts. Those dot figures just leaped out at me, drawing me into their exciting world. You'll have to scroll down a way to
reach Jungle Rhythym, but it's worth doing slowly to enjoy Nancy's other work. I think that was about the time I started collecting ethnic themed fabrics. I think the primitive design elements really transcend cultural boundaries. I could easily mix many Australian, African and American Indian patterns when the ethnicity is non-specific, and I'm sure this is the commercial intention of the fabric designers and manufacturers. Reflecting just now, I'm realizing beads are an integral part of most cultures. Beads. Du-uh... Dots! Points!!!

I'll relay one more recent duh moment. I happened to glance at a tv commercial because the dots moving around were definitely attention-getting. I was proud of myself for spotting this
outstanding use of point, then appeared the primitive figures, then the didgeridoo sounds, then just as I was prouder still for recognizing aboriginal art influence, the hype for Outback Steakhouse began. Time for another sip of Alice White cab.

Thursday, November 16, 2006

Sharon B's Stitches Class


I'm behind in my blogging since Sharon's class started 2 weeks ago. I've been having too much fun doing the homework! We are compiling a personal library of stitches, whereby we study the components of a stitch and explore the possibilites of usage : entire, in part or in combination with other stitches. Considering the different fibers available, the potential of an individual stitch becomes seemingly infinite.
We are working samplers of different sizes . The first one I started is conventionally formatted, but like others, I'm also opting for postcard sized samplers where I can explore more randomly.
We are starting on linens and evenweaves but will be experimenting with other fabrics like felt and buckram .
Above is my sampler at the end of Lessons One and Two. I will be refining some stitches later, and I'm saving beadwork and filler stitches for last. Here are the descriptions of the stitches and fibers used to date.
Week One
25 ct Dublin linen
border: stem stitch in Wildflowers
band 1: guilloche (Wildflower posts, #8 pearl weaving, #5 Fr. knots)
band 2: first row running stitch posts in Watercolours, 2nd row satin stitch postswoven threads ( #5 pearl cotton)
band 3 vertical, satin stitched posts , Portugese stem between posts (2 strands cotton floss)
band 4 mirrored fly stitch (2 strands Waterlilies)
band 5 line of Basque knots (#8 pearl cotton)band 6 variegated rayon/acetate ribbon yarn couched with 2-chain zig-zag (single strand silk floss)
Filler stitches and beading will be added later.

Week Two
I added a few beads to Week 1, but won't add more until I've finished the stitching. I also re-did the Portuguese stem stitch between the posts in band 3.
Week 2 begins with the heavy teal band midway :
band 1: Portuguese stem stitch in 2 strands of cotton floss followed by second row of the same stitch in a wool tweed yarn.
band 2: double fly stitch mirrored and linked in #5 pearl
band 3: stem stitch, first in #12 pearl, then in #8 or 10
band 4: triple chain "butterflies" in rayon floss alternating with knotted cross stitch "stars" in Watercolours
band 5: 2 rows of running stitch in velvet cord, laced with a sparkly cabled cotton yarn.
band 6: triple fly stitch variation in Wildflowers, French knots in hemp yarn.
band7: tulip stitch, chains in silk floss, woven V's in Waterlilies. Fly stitches repeating below V's in #10 pearl.

Saturday, October 28, 2006

Latest Projects


I've been waiting til I get caught up before posting, but since that's never going to happen, I figured I might as well use time writing as anything else. You can see two sets of my vacation pictures on my Fiberdabbler Flicker site. Click on the sets Westward Ho! and Westward Ho2!

I worked on my Hardanger GCC project. I find I need completely uninterrupted time for this pursuit, particularly when it comes to the wrapping and weaving of bars and subsequent motifs
(we must accomplish 18 different ones!) Here's what I have so far -- actually no more than when I left for home, I'm ashamed to say. Lucky me, our co-ordinator has requested an extension for us so I now have until January.

What's in my head? I signed on for a freeform challenge, also due in January. I signed up for
another online class with Sharon B, starting next week.

I completed the Bijous Blouse sweater from Oat Couture over the summer. It was the perfect project for travel. The end result was not great, rather A-line to the extreme and overall a bit too big, but I was going for the inside out sweatshirt look and just something to wear around.

I'm working on a new sweater and itching to start another.
My current sweater project appeared on the cover of May 2006 Creative Knitting. I wanted the same yarn and the same tweedy denim color. Although the color was rumored to be discontinued, I eventually got some after 3 months of waiting. I like the way it's working up.
I added some length, and I hope not too much or it will end up like my Diamond Patch sweater that started tunic length and has already grown to mini-dress. Actually I think it could be quite
a stunning garment if it ever gets to ankle length.

Bonnie Prokopowicz from the International Freeform list showed us a scarf she made up using links of FF medaillons.
I couldn't resist playing with the idea with some yarns I bought while in CA .


I did not neglect CQ this summer. Although I had said I'd never again take a CQ project when travelling, I changed my mind when I realized I could fit most of what I needed into a small tote box. I'm not ready for show and tell yet, but I will mention that the block is constructed from
recycled Goodwill clothing, mostly wool, which I fulled, but also the odd bit of wide wale courderoy and velveteen. Colors are limited to reds, grays, black & silver. It's supposed to have a Pacific Northwest "feel" to it.

Friday, September 15, 2006

VACATION'S OVER -- sigh

On the other hand, it's good to get back home. After three months I have a great deal to catch up on, really important things like housecleaning, dealing with missing mail and critters bouncing around our attic. These necessities tended to, I will resume posting.

Monday, June 12, 2006

Bear Wallhanging


bear wallhanging, originally uploaded by Fiberdabbler.

My first finished quilted project. I started it probably 5 or more years ago -- before I learned the lesson of precision seaming. I made this from a kit from a design by McKenna Ryan at Pine Needles. It required minimal quilting which still intimidated me and caused me procrastinate. Fortunately the beautiful batik and tone on tone fabrics hide many of my boo-boos. Last year I did the machine squiggle behind the bear. Just the other day I stitched in the ditch and applied the binding. I purchased decorative bear rod ornaments when I got the kit and, providing I can find them, will hang this piece in my dad's cabin in the High Sierras. With its myriad imperfections it will serve to remind me of lessons learned. Didn't the Amish purposely include a humility block?

Friday, June 09, 2006

Did Someone Say OPTIONS!!!

I am incorrigible. I went to the thread store to get needlework yarn for a CQ project plus a couple of skeins of Caron that were backordered for the Options in Hardanger class. As you can see below I gave myself even more options and more decisions than I need to fret over. What was I thinking? I'll tell you -- and you'll note how fast, how easy, how adept I am at justifying each stash purchase. I bought my Lugana on sale, a fat quarter for $4.95, so I'll have enough fabric for several projects. Any leftover thread from that will find its way into my CQ or scrumbling.
I could avoid option angst by sticking to traditional white on white, but I'd be sacrificing the exhilerating rush I get when I see a profusion of threads (or yarns or fabrics or beads or...) in
seemingly endless combos of color. The thrill even extends to the at home experience of admiring my purchases. I'm proud of my indulgences. Let's see, if I'm grateful to be able to
indulge, does that soften the sins I've confessed to today?

Thread Audition 2


25 ct Lugana dark terra cotta
Caron Watercolors - arroyo
Waterlilies - blueberry
Watercolors - terra cotta
Wildflowers - periwinkle
Watercolors - Santa Fe
- Paprika
Wildflowers - dark terra cotta 3061
Watercolors - Fiesta
DMC #3 pearl - #501

Wednesday, June 07, 2006

Options in Hardanger

I've signed up for another hardanger course after taking Beginning Hardanger twice. I refuse to admit defeat and won't give up till I get right. My greatest nemesis is the picot. Then there's the problem of actually seeing what I'm stitching. For this project I've selected a 25 count fabric and hope I can manage without auxillary magnification apparati. I fully intend to have a special pair of needlework glasses made; I'm sure it will make a huge difference.

I'm leaving soon for vacation and wanted to be sure I had my class materials to take along. I ordered fabric online along with several Caron colorways I thought might work. As usual I've given myself too many choices. Almost all of them work as you can see below -- even though the color is not quite accurate. I tried scanning, but the digital camera did a better job on the
colors.

thread auditions


25 ct Lugana in dark terra cotta.

Caron Watercolours from top to bottom:

054 terra cotta
183 Santa Fe
198 Arroyo
Wildflowers 3061 dark terra cotta
191 Avalon
036 tobacco
not shown is the color Fiesta also under consideration

Tuesday, June 06, 2006

Sally's Favorite Summer Sweater

Below is my latest finished project, a pullover from Sally Melville's Knitting Experience: the Knit Stitch. In the pictures below the color may look like my Diamond Patch Sweater, but my
SFSS is in a solid turquoise, which, surprise,surprise, is my very favorite color in the whole wide world. The captions tell what changes I might make, and let me add, I would not use 100% cotton again. This is a loose, already oversized sweater that is sure to continue to grow. I would not make it again unless I were on a long trip when mindless knitting was in order. It was boring (ideal project for a beginner!), and I became impatient with more challenging projects in queue. Still, I managed to finish it.

FaveSummer2


FaveSummer2, originally uploaded by Fiberdabbler.
The design is meant to be oversized, but I would make it smaller next time and maybe avoid the increases at the fabric transition. I would prefer it hang straight. I am also tempted to crochet around the neck and sleeve edges which look a little "raw". Still, this should be a nice, comfy summer sweater.

Sally's Fave Summer Sweater


FaveSummer, originally uploaded by Fiberdabbler.
Sally's Favorite Summer Sweater from Sally Melville's bookThe Knitting Experience: the Knit Stitch. Done in solid turquoise cotton (a light worsted or DK weight) entirely in garter stitch using 2 different needle sizes to create 2 different fabrics so you get loose and airy for the sleeves and bottom section, denser guage through the mid-section.

Wednesday, May 31, 2006

Fiesta! Beginnings


Fiesta! Beginnings 2, originally uploaded by Fiberdabbler.

My block began with embroidered fabric from a recycled dress or beach cover that looked like it could have been from south of the border. After piecing, I couldn't decide if it looked like a musical note or the embellished pantleg of a charro. Whichever, it would be festive, hence the fireworks print. Bright colors made brighter in contrast to the black shout excitement and celebration. In deference to the charro theme I used scraps of faux leather in red and black for a masculine touch and in anticipation of later equine motifs.
This is only a segment of the basic block. You can view more, along with detail shots of the finished project at my Flickr site in my Round Robins set. Click here for a brief history of charros in Mexico and the SW . Also click here for links to info about charros.

FIESTA DEL CHARRO


FIESTA DEL CHARRO, originally uploaded by Fiberdabbler.

This is a completed round robin block I previously called Fiesta!, and if you follow the link you'll see the collaboration of 6 other stitchers. It would have been a beautiful block left at that; I intended merely to add a charm or two and finish up a couple of naked seams. Obviously encrustation lessons from Sharon Boggin took hold, and although I tried to balance busy spots with a few sparse ones, I may only have succeeded in gilding another lily. I do like to think the work of my talented fellow players stands on it's own, my finishing touches secondary. My only changes to previous work was to reposition a button and a charm, and regretably had to redo ole, which was originally rendered in a very pretty variegated thread.

Sunday, May 21, 2006

La Vida Laredo


La Vida Laredo, originally uploaded by Fiberdabbler.

When I first decided to try crazy quilting I had zero stash: no fabric, no threads or fibers, no beads, ribbons or embellishments of any kind. One of my first acquisitions was a wonderful fabric assortment from Karen South. The woven stripe you see in two of my patches caught my imagination right away, and from the first I knew I would someday use it in a Mexican theme, and over the next years I gathered embellishments suitable for such a project. A while back
I hosted a Southwestern swap followed by a round robin. The desert landscape fabric is one I contributed to the swap, but my most prized goodie from that exchange was the geometric patterned fabric that I immediately interpreted as a stylized desert landscape. And the colors! So close to my equally prized "serape" fabric! Instant color palette!

For the round robin I pieced two southwestern blocks, this one which I called Desert Sunrise (or was it Sunset?) and another in a completely different colorway I called Fiesta. It was the latter which circulated through the round robin and to which I am presently adding finishing touches. Desert Sunrise/Sunset I kept. I'd decided it would be one of two blocks that would represent a bit of family history. When I find the stash I set aside for it, I'll piece the companion; meanwhile Desert Sunwhatever has morphed into La Vida Laredo and represents the years my paternal grandfather lived there with his first bride (I descend from his second wife). Strictly according to family lore, she was from a wealthy family in Nuevo Leon, grand or greatgrandaughter of one of the original Spanish land grantees. In the pictures I have seen, she is a beautiful young woman, elegantly attired. One of the photographs was taken in Paris, where she may have been a student. Tragically she died young in childbirth in 1911. I've often wondered how they met.

I placed symbols on the block to represent my grandfather. There is the initial S for the surname we share, a button representing the railroad for which he was a conductor, and another button in the shape of a miniature Winchester rifle bullet to suggest his reputation as a fine hunter. There are two stars, one to symbolize his Texas birthplace, another tributes his special appointment to the Texas Rangers.

Tuesday, April 25, 2006

Knitter's Log, Stardate 25.04.2006

Some UFO's just deserve to be zapped, not abandoned as permanent space junk, zapped out of existence, dematerialized. And so it was I zapped another lesson in humility from several years ago and unravelled an almost complete sweater I was trying to upsize from a child's pattern.
Knitting arrogance subdued again, awareness of the sin brought home with each re-wound ball.

The yarn, a rather nice pima cotton, seemed to have survived the ordeal without dreaded kinking, maybe because I tend to knit a little loose, maybe because it was good yarn, maybe because I got lucky. Actually I was very fortunate, as I also had close to a dozen brand new skeins of the same yarn! I decided to knit Sally's Favorite Summer Sweater from Sally Melville's Knit Stitch. It's a unique design in that it has both sheer and opaque fabric. It is an easy pattern, perfect for beginners.

I actually began this sweater last fall while I kept vigil with our terminally ill daughter. It was perfect in that regard because I could work on it somewhat mindlessly, just straight knitting and pause for an occasional measurement. I completed the front and most of the back and then set it aside. I don't remember much about winter and am still surprised to find it is spring, which has kept me very busy with crazy quilting. Now and then I would work on the sweater, but
the sameness was tedious and didn't hold my attention. It has occurred to me at last that summer is rapidly approaching, and if I don't get busy, I won't have a new summer sweater!
Sally's Fave has been rescued UFOdom, total assimilation soon to be complete.

Sunday, April 16, 2006

Showed and Told

Yesterday I met up with my CQ bud and local mentor Karen South at a bead show. It wasn't crowded, I guess because of Easter weekend, so we were able to sweep through pretty fast, still doing our best to distribute our dollars among all the vendors. Karen is sensible and tries to buy only what she needs. She doesn't have to stash build; she's beein CQ'ing for years. Still I tried to tempt her with my own enthusiasm and managed to get her to cave when we found a great cache of vintage German and Czech glass buttons and beads. They were tiny and perfect for embellishing, and they were 50% off! In my greed, I mean excitement, I left behind my purchase from the previous vendor.

Next was lunch and the much anticipated show and tell. Karen also took Sharon B's Encrustation class so we shared our efforts. Karen has not yet finished, but her block is so stunning she could say it was complete and no one would question it. Her stitching and beadwork are so elegant and sweeping (not tight and crowded like my own) they deserve to be showcased and can easily hold the viewer's attention without other gimmicks. Also, she has a wonderful sense of color. I also got to see her block from the beaded round robbin. Everyone's beadwork was exquisite. Also got to see other of her blocks, finished and in progress, plus some hearts she's doing for international exchange.

Besides my block I brought along my challenge scrumble, "Winter Greys". I think several of us have just about convinced Karen to give scrumbling a try. Geez, she already knows how to crochet!

I grabbed some fibers for Karen as I was leaving the house. She brought me a wonderful
squishy with fabric she knew I'd love, some of her hand dyed lace, and other goodies. Surely she was equally thrilled with the used dryer sheet I gave her!

Saturday, April 15, 2006

lt's finished!!!


finished block, originally uploaded by Fiberdabbler.

At last my block for Sharon B's Encrusted Crazy Quilting class is complete! I enjoyed every stitch of the adventure and look forward to Sharon's next course offering. I learned a new approach to embellishing a block; instead of completely embellishing one patch before moving on, we were encouraged to think ahead and work on the whole in specific stages. I think this keeps our focus on the entire block and helps us work toward a creative goal. Another thing that falls in place with this method is
unity, better balance of line, color and motifs, all the while maintaining paths for the eye to meander along.

Please take a look at the 4 detail shots that follow and feel free to comment or ask questions.

detail1


detail1, originally uploaded by Fiberdabbler.

detail2


detail2, originally uploaded by Fiberdabbler.

detail2


detail2, originally uploaded by Fiberdabbler.

detail3


detail3, originally uploaded by Fiberdabbler.

I'm thinking of stringing some seed beads through the shells and rocks to give that area more unity. I may give the fiber fluff on the beads a trim. My egret is already having a bad feather day made worse by a bad hair cut and resulting split ends!

That floral fabric patch was problematic. It was large and bold, and I wasn't sure how to encrust it. I used the buttons as the flower centers, and it still looked plain .
Added those two disc flowers with leaves, and that helped. I'm not sure what those discs are. They appear to be horn and the edges are notched. I found them in NZ. That space still needed more, so I couched down some of the yarn I used in the woven seam at the top. Being neutral but varied in color, the yarn brings a little cohesion to the spot.

Should I fill the egret's tummy? He doesn't need more flyaway feathers, but I'm tempted to embroider a fish skeleton.

detail4


detail4, originally uploaded by Fiberdabbler.

In the upper left you can see my leopard butterfly. You can't really tell, but he has dimension. He's made from the fabric of some wild looking yarn. That's the shape of the piece as it's plied in with the yarn. I pinched it together, tucked under extra length. He's so easily lost on the dark teal background, I gave him bright turquoise eyes and legs.

How 'bout those buttons! They're from the 60's, I expressed my disappointment to the seller when I lost the bid on a lot of jungle-y buttons. He put together a similar lot just for me and included some really neat surprises .

I had to fit in maize. Underneath is a piece of the onionskin dyed satin ribbon, which actually would have been fine by itself. I decided to add just a few beads to even out the outline. Well, those gold beads went together so nicely. I have to tell you they're
Delicas (Japanese cylinder beads)so they snuggle tightly. I then used seed beads for contrast (Indian corn)in color and got texture to boot.

Monday, April 10, 2006

Experimenting


progress 2, originally uploaded by Fiberdabbler.

I tried 2 things I heard about on the Crazy Quilt Embellishment list.

First I used the press and seal plastic wrap to outline the mola birds.
I traced the major lines of the mola images with a bold permanent marker. Then plaed the tracing where I wanted it. Because the plastic wrap is somewhat translucent, I could better see to position the image. I did an outline stitch right over the tracing.
Then I had to remove the plastic; I'd been forewarned to use tweezers. I found it was rather stubborn and tended to pull on my stitching and tried to take any furry fibers with it.
Maybe my outline stitching is too loose. At any rate I probably will not repeat this method lest I distort any stitches.

Take a look at my butterfly. I experimented with used dryer sheets. I had a jar of onion skin dye that I used for dyeing some ribbon for this
project. Just for the heck of it I scrunched a dryer sheet in among the onion skins and let it sit on the windowsill for a couple of days --or until I remembered it. I got just what I had hoped for. A mottled russet
color on a textured sheer (I used Bounce brand fabric sheets) looked really cool, even wrinkled. I never did iron it (one could), just smoothed it a bit with my hand.

My original intention was to use the fabric sheet in lieu of organza or chiffon and had planned to do some machine freeform on it or other fiber play. I haven't gotten that far yet.
I decided to use it as a base for my
butterfly. It won't ravel so I was already thinking flower petals and wings. This was possibly the easiest butterfly I've ever made. Outline stitch in metallics, bugle bead body,
cylinder bead eyes, straight stitch
antennae. I added dark colored French knots to the bottom wings because this is a leopard butterfly. Those are tiger lilies (I always thought they should be leopard lilies because they're spotted)next to the right, and if you can recognize the hanging orchids above, they're leopard orchids.

Friday, April 07, 2006

Humility 101: Self Taught

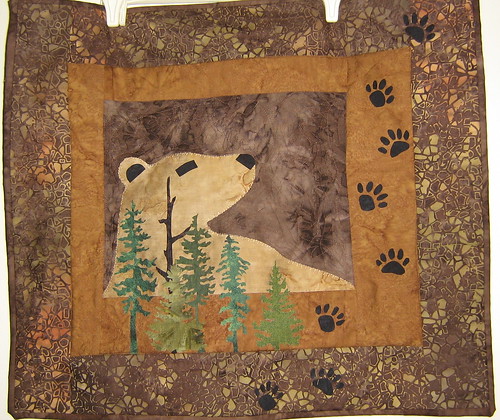
I learned to knit when I was 10. I learned to make ski sweaters when I was old enough to realize how much ski sweaters cost. I was a precocious 11 or 12. My mother took me to a knitting store where I could pick out yarn and have assistance in making my first sweater, a
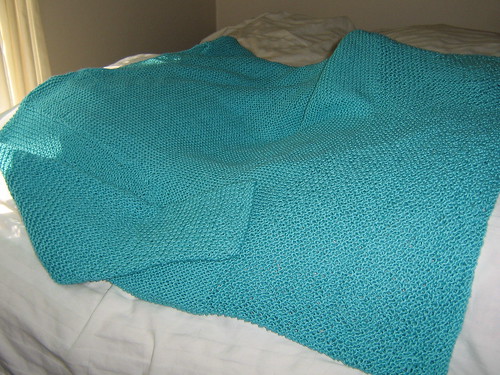
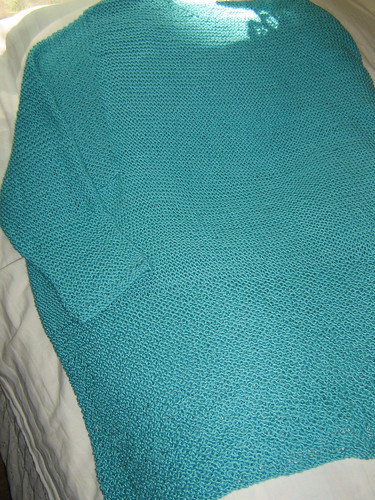
raglan-sleeved, cabled cardigan in bright turquoise, worsted wool with Norwegian heart buttons. It turned out well, I wore it often, but I gave it to my college roommate (who had ski pants that matched perfectly) in exchange for weekend rides to a ski resort.


I enjoyed knitting from that first sweater on, already realizing the theratpeutic benefits of the
craft along with the resulting wardrobe of Nordic style ski sweaters, all of which I still have! I'm thinking about fulling them and recycling them into something new. We'll see. This story is dragging on. The point I wanted to make is that when it came to knitting I was very confident.
I could interchange yarns, I could duplicate almost any sweater I saw, and I even designed one or two for myself. I could recognize quality yarn and knew how to shop for it. Then I stopped.
Kids were gone. I didn't ski anymore (no longer lived near mountains), and I had other interests that occupied my time and money. I simply stopped knitting for almost 20 years.

I wondered why I'd stopped and reflected that maybe I was no longer challenged. You can take your finger out of your mouth now. You are right, I was full of it! And I found out just how full
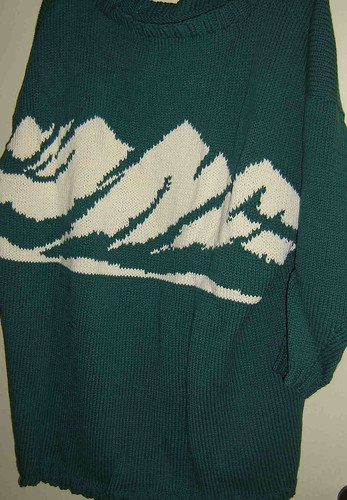
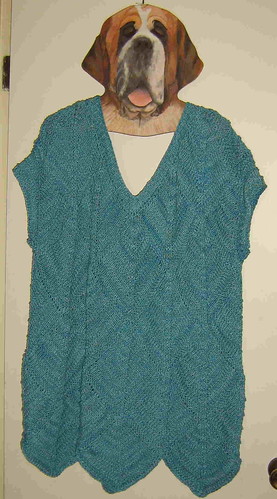
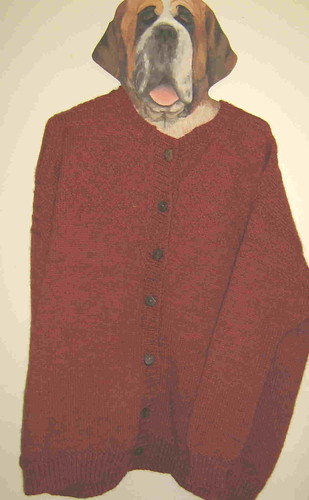
when I took up knitting again. I really wanted a St. Bernard sweater, and I was convinced I could make it nicer than the ones I saw and for less money. I sent for a pattern. Intarsia? What's that? Oh, picture knitting, using lots of colors. I can do that. DK weight? Hmpff,
whatever. I know how to change yarns. It's a ski sweater, right? Gotta be worsted or thereabouts.

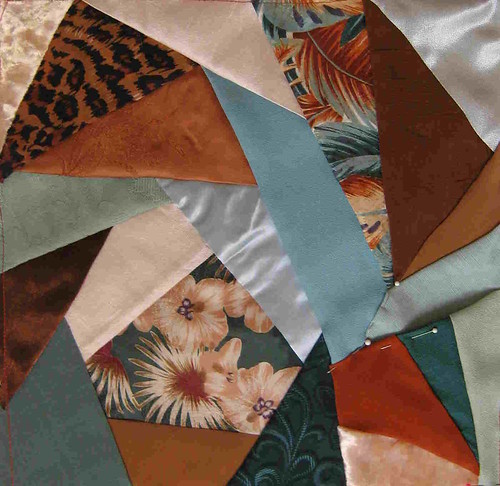
Undaunted, I started to look for yarn. I had never knit with anything other than wool. I deplored synthetics. I decided I would knit in cotton so I could wear the sweater year round.
Even though I asked for advice, I was so darn sure I knew more than they did. Arrogance does not begin to describe my attitude. Finally I decided on a cotton blend, and owing to its availability, reasonable price and extensive color selection (I needed a kadjillion shades it seemed), I went with Brown Sheep's Cotton Fleece.

Started right in after a token swatch. What, me swatch? I always knit to guage, maybe a little
looser, but I want the sweater a little bigger. Evens out, right? Of course, I'm always right when it comes to knitting. Oh, and I'll just do this on circular needles like I've always done. No seams for me. Of course as I come to the color changes, I realize knitting in the round is a very bad, no, stupid idea. What was I thinking. I frog and begin again. Works up quick. I love knitting. Why oh why did I ever stop. I finish half the front and hold it up to me for a fit check in the mirror. Umm, it seems to already be the full length of the sweater, and if I pull it around me I think the sides might meet. Rip-it. Rip-it.

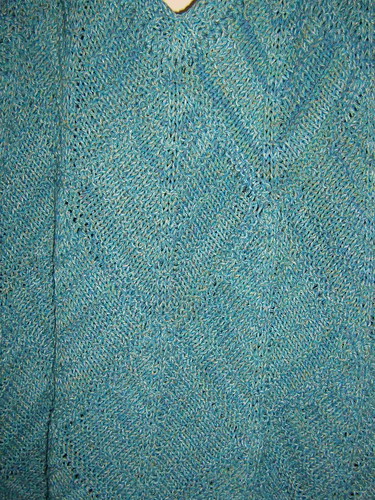
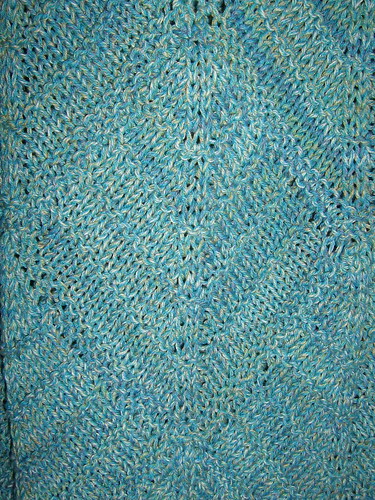
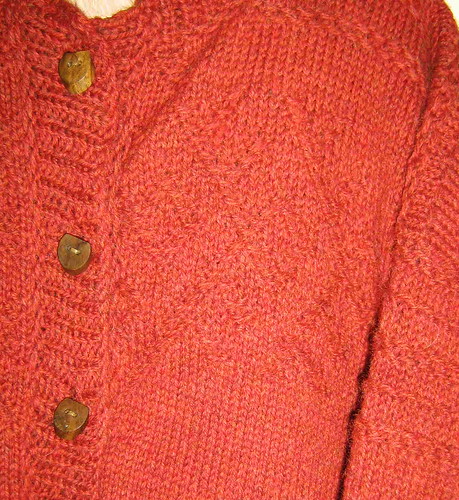
Dropping down 3 (or was it 4?) needle sizes later, the fabric in my swatch is getting rather firm and is still not to given guage, which is okay because I want it a tad bigger. I'll spare you the rest, especially about the intarsia part which I was trying to do carrying the yarn over in the back; ie, entirely wrong! I finished the sweater. I changed the ribbing and created a larger
neck opening. I made it tunic length. I made one ugly sweater. Blocking made it worse.
The sweater was so heavy it continued to grow every time I picked it up. I actually wore it
in public a time or two. I anticipated compliments when strangers approached me only to
cringe when they spoke, "Excuse me, you have a hole in your sweater. You might want to catch it before..." More holes than Swiss. And I wove everything so carefully...

Maybe I'll toss this puppy in the washer some day. It won't felt, but maybe it'll shrink.
I came to loathe Cotton Fleece even though it wasn't the yarn's fault. I really just didn't care for its properties. I will probably never use it again, so today I offered my leftover skeins free to others who wanted to try it. They may or may not like it. But at least they won't have to pay to find out. I do not consider the project a waste of time and money. I did everything possible
wrong even though I knew better. I guess I was complacent enough to think it didn't matter.
I learned a much needed, priceless lesson in humility.

It was 6 or 7 years ago that I knit that St. Bernard sweater. One of these days I will do it over
in an appropriate yarn of the appropriate weight in the appropriate technique, and I will follow the designer's excellent directions. I will not be cocky. I will reinforce the lesson.

Bad Dog!


saintsweaterfront, originally uploaded by Fiberdabbler.

Alps in the Back Ground


saintsweaterback, originally uploaded by Fiberdabbler.

Sunday, April 02, 2006

Progress at Last


progress 1, originally uploaded by Fiberdabbler.

The block is now beginning to take direction. It wants to have a Central American folk artsy feel.

I pretty much finished my first bird --
that's a fish in his beak -- and knew I wanted my flora and fauna primitive and fanciful, folk artish. I googled images of molas for inspiration. You'll see I stayed within my initial pallette and used a different technique for each bird. The pair is
beaded, the toucan is bead with silk ribbon, and the bird feeding on berries is embroidered.

Centipedezilla was too overwhelming, so I reworked that seam. It's a vandyke stitch done in cotton pearl and
has definite dimension.

I wanted to somehow justify the animal print fabric, so I thought about jaguars and their significance in ancient Mayan culture. I started a pyramid and took the outline from a line drawing of a jaguar snacking on a human heart. It was a ritual thing and
goes back to my senior English term paper.

Still quite a way to go before this block can be considered encrusted. I hope when finished it will require a guide and interpreter. Next step I'll concentrate on flora.

Initial Seam Treatments


start of seam treatments, originally uploaded by Fiberdabbler.

Justed wanted to prove I have been working on my block. I have completed just about all of the foundation seam treatments (added more since I took photo). I'm ready to add SRE and beading to the seams. I started a bird motif, and I pinned on a flower motif to break up the giant centipede.

Stash


project stash, originally uploaded by Fiberdabbler.

I'm sooo behind. I had one scheduled interruption with houseguests, but I look so forward to their visits I didn't mind and did a bit of organizing ahead of time.

Understand, our spare bedrooms serve as my various work stations, meaning my CQ studio would be in use. You also
have to understand that when I'm working on a CQ project, I utilize the
entire room -- every available surface
including floor and queen size bed. I have to see everything as I work.
Okay, so I began the project prior to the visit, but in anticipation I kept
all of the fibers and embellishments I thought I might use in or near a big plastic bin. Instant tidy. Fit in perfectly with my token housecleaning duties.

At present I have tons more than you see here, all logically strewn for instant access. I've been stitching happily everyday, pledged this project will not become a UFO even though the class ended last Thursday.

Wednesday, March 01, 2006

TICKLING THE PALETTE

Besides Sharon B's CQ class I'm participating in a challenge issued by Prudence Mapstone to members of the international freeform knit and crochet group. She asked us to submit scrumbles from which she would create a garment. We voted on the type of garment (a coat)
and the colorway (jeweltones, and if enough scrumbles were sent we could contribute optionally to the second choices, a shawl in underwater hues. To me this is a bold endeavor on Pru's part, first finding the time and then assembling our interpretations of jewel colors into an
exhibition piece to be presented at Chainlink this summer.

Ensuing discussion made it clear many of us weren't really sure which colors would qualify as jeweltones. There were suggestions of actual gems and royal trappings, stained glass,
brights, etc. We could readily agree that earth colors and pastels would not be included, but
then what. Since I usually go for muted shades and off colors, this colorway is a challenge for me. About the time I was playing with the Palette Generator, someone from the challenge group shared her color toys. I can't wait to play with them!
http://wellstyled.com/tools/colorscheme2/index-en.html
http://ambience.ru/color/

Tuesday, February 28, 2006

BETTER THAN CRAYONS

I'm so excited to be enrolled in Sharon Boggon's online course for encrusted crazy quilting. I'm off to a slow start, but I've had too much fun playing with my first week's homework. I never really thought much about color palettes, never thought I had a problem pulling together pleasing combinations. It's been something that always came easy to me, and creating palettes
(real and now otherwise!) has become one of my favorite things to do. In fact, you don't want to shop with me if it involves selecting colors for anything unless you're willing to spend hours of
blissful abandon trying this, that and the other together, then stress with me while I try to
choose which combos I like best. Strangers have made this mistake asking my opinion about a
tie selection or putting some yarns together or... You get the idea. I do spend double duty in
hardware stores playing with paint chips or browsing for "stuff" I could use in crafting.

I have several excellent books on color theory, which I have read and enjoyed at an academic level, but truly much of what is suggested comes automatically to me without my having to know the why of it. This is not to say that my palettes are always perfect. They are pleasing to me, which is enough, but I'm frequently guilty of sticking with favorite colors. Well, I love them, and they're soooo comfortable. It's elementary to know that a print fabric will yield all the colors necessary; duh-uh, we can even follow the dots printed in color on the selvedge of some fabrics. To marry two or more solids that don't seem quite right, put them with a multi that includes those colors to "verify" compatibility. Of course there are proportions to consider, but that's another subject.

To me it's a given that nature is our best palette source, and what we can't see with our own eyes we can see in photographs or through the macro lenses of National Geographic photographers. This brings me to Sharon B's first lesson . Among her many useful suggestions for discovering and recording colors was a link to an online color generator . I must confess, I had so much fun playing with this utility, I put off doing my homework! I googled images.I used my own. I just had a ball. However, not all the time was wasted. I did perform some experiments related to my course project, and as you'll see, I got my homework done!


Here are two prints I selected to begin the palette for my patchwork block. Anyone who's bought fabric or fiber online knows, albeit forewarned, is that virtual color is not always accurate. The actual teal of these fabrics is greener than shown.


These are my final fabric auditions pulled from my stash to complement the basic prints. Photos may not show the variance in materials, sheens, textures, etc. Most are silks; there is some handpainted velvet. As usual, I get carried away by the many possibilities and am left with the
almost painful task of elimination.


Before I reveal my end result, I have to tell you about my experiments. In the first one I used the Palette Generator and got a result you can see at:
http://jrm.cc/color-palette-generator/?image=images%2Fscan0006.jpg&steps=3

Next I created the palette from memory as best I could using my Paintbox accessory. Then I inserted the image of my fabrics into Paintbox and used the eyedropper tool to pull colors to create a virtual palette. Scroll down to see remaining pix.

Memory and Virtual Palettes


Palette from Memory, originally uploaded by Fiberdabbler.

I always thought I had good color memory, but I was thwarted in my attempt to come up with a visual representation of the colors in my head by the limitations of my paintbox program. I do have to say my
memory generated custom colors are truer to the colors of the actual fabrics.
Interesting experiment.


Virtual palette, originally uploaded by Fiberdabbler.

I used the eyedropper feature of my paintbox program to pick up colors in the two swatches. Although I show the closest to the actual dominant color, it's really based on the best representation I could do with my scanning and photo programs. The actual color is a decidely greener teal than shown.

UP OR DOWN?


block up, originally uploaded by Fiberdabbler.

This was the directional layout I intended as I worked. It's fine, but I had to play some more.


block down, originally uploaded by Fiberdabbler.

Maybe I like it better upside down. I
played around with the rotation tool in my photo program to see how it would look. That was fun, too. Meanwhile the block hangs on my design wall for further contemplation while
I gather fibers and embellishment goodies for the next steps.

Wednesday, February 01, 2006

Diamond Patch Sweater


Diamond Patch Sweater, originally uploaded by Fiberdabbler.

Modular knit design by Jill Vosberg at Just One More Row.
The yarn is a cotton tweed called Pasticcio from Elann.com's Endless Summer Collection. The pattern offers 2 methods of construction with multiple sizing. I added an extra row of diamonds to get a tunic length, and I upsized slightly by changing the guage of my basic diamond.

Detail of Diamond Patch


Detail of Diamond Patch, originally uploaded by Fiberdabbler.

Diamond Detail


Diamond Detail, originally uploaded by Fiberdabbler.

Friday, January 20, 2006

High Mesa Cardigan


High Mesa Cardigan, originally uploaded by Fiberdabbler.

A knitalong project with the Ample Knitters eGroup. The pattern was from Brown Sheep and painstakingly resized for the Amplistas. I knit this in a heather worsted wool from Elann.com's Peruvian Collection.

High Mesa stitch detail


High Mesa stitch detail, originally uploaded by Fiberdabbler.

I tried to find suitable southwestern buttons, but settled for these handcrafted, vintage, wood buttons. The horseshoe shape complements the reverse carry over stitches.