About Me

Showing posts with label "freeform embroidery". Show all posts

Thursday, January 26, 2012

Monday, January 23, 2012

TAST 2012: Feather Stitch

I truly love feather stitch.  It meanders, spirals and can be linear.  And it's so graceful!  My favorite work with this stitch is the sampler I did for the original TAST.

Monday, December 27, 2010

TAST 2010 - WEEKS 38 - 44


This is as much as I got done in the assigned week.  I kept thinking I would add something else or take something out, but I never got around to it, and now I don't remember clearly what I was trying to do.  I can see I worked a spiral, worked the chain with picots on either side, and worked the chain zigzag.


The background cloth is another piece of tea dyed dish towel.  The Watercolour shows up a little better than the Wildflower thread, but there's not much to see.  Sadly I didn't put a lot of time or thought into this assignment.  It was Thanksgiving week and I was juggling two overlapping online classes.  The picots are lost in the terry loops, and because they're placed randomly along the irregular lines, they're hard to spot anyway and not worth the effort IMHO.  I'll simply say the upward spikes have bullion picots and downward the chains. 

Magic Chain:  3 rows of chain just under TAST '10.

Woven Cross:  above and below the single line of beads.  I considered weaving the lettering which I added later, but ran out of time and steam.

Crossed Feather Stitch:  the top row, worked in Wildflowers.

Plaited Feather:  bottom rows.  If you look at the tangled center, you can maybe see I worked the plaited version between 2 rows of straight-sided feather stitch.

Even though my work was lackluster toward the end, I feel a sense of accomplishment for having completed the challenge and extreme gratitude to Sharon B for leading us through this wonderful learning adventure.  Tuesdays will not be the same without a new stitch to look forward to.  I'm thinking I might pick up the ones I missed in the original TAST challenge, and after that I'll probably tackle the Stitch Files.

You can view all of my TAST 2010 work here and original TAST here.
You can also view the photo pool for all TAST '10 participants here.
Join all of us at Stitchin Fingers, an international, online community for all manner of stitchery, fiber and needlework.

Friday, October 22, 2010

TAST 2010 - BUTTONHOLED DOUBLE CHAIN

WHERE CREEPIES CRAWL
AND SLITHERIES SLIME!!!!!


When you visit the tutorial for Take a Stitch Tuesday's 34th week, you'll see an example of a nice border.  But beware!  You can take this interesting stitch to other places.  I used a piece of wool felt for the background and let my needle go with perles , #3-#8, or two strands of floss. 

I'm thinking Halloween, but see what others are doing here .

Saturday, October 09, 2010

TAST 2010 - SHELL CHAIN STITCH


 I love a stitch that meanders.  On its own it's about as exciting as a paper clip, which it can resemble when worked as a zig-zaggy line.  Fortunately for us, Sharon's sampler showed us the potential for wonderful texture with use of yarns and ribbons and inclusions.  This is why I went immediately to a burlap with loose enough weave to accomodate the funkiest of yarns.  As it turned out, I only used one , the soft lilac which is a knitted tube of gossamer fiber.
After laying down a few gentle curves, I experimented with a spiral and a simple, daisy style flower.  The gold rayon ribbon I used to weave as well as working the shell chain.  In the detail below you can see another flower with two rounds of shell chain stitch.


Here's a close up of that flower.  For the most part in this sampler I used perle cottons, #3 -#8, doubling some for bulkier effect.  The gold thread is an inexpensive one I bought on a large tube in a craft store.  It doesn't kink like some metallics and is very easy to sew with, although threading it is sometimes another matter.

Thursday, October 07, 2010

TAST 2010 - RAISED CLOSED HERRINGBONE

Take a Stitch Tuesday - Week 31

Let's hear it for the threads!  I started in the center with the heaviest of the threads.  It is a #3 perle hand dyed in ametrine hues by Jane Van Keulen, a talented New Zealand artist.  The final round of tiny leaves and sprigs is hers also, a rayon floss I used double stranded.  It has spectacular sheen and variations of russet.  The four large coral-orange leaves were made with a single strand of  Caron's Watercolours.  They are followed with smaller leaves
stitched with a single strand of Stef Francis silk perle.  Finally the border uses 2 strands of Caron's Waterlilies and #11 seed beads.  The background is Belfast linen.

I was going for a medaillon effect so I found the center of the fabric and basted lines that would divide the work into eights and used those lines to center the leaves.  I was able to alter the shape of the leaves by varying the foundation stitches.  For example, the two foundation stitches for the largest leaves are the same length, but the reddish ones have a shorter upper stitch.  I realized if I began that upper stitch a little off kilter , I could get a slight curve for my leaf tips.

Although my design is symmetrically based, I tried to bring as much variety as I could.  I'm well pleased with the different colors and textures and wholeheartedly give credit to the threads!  Precision is for charted patterns.  I wanted my leaves, while "posed", to still suggest naturalness, and when imperfect stitches occurred I pretty much let them stay.

Don't forget to see what other participants are doing over on Flickr.

Monday, September 27, 2010

TAST 2010 - EASTERN STITCH

 Take a Stitch Tuesday, Week 2
Eastern Stitch

I wasn't very enthusiastic when I started this stitch, but the more I worked it the less rigid it became.  I could alter the appearance with tension, size and thread, and I found it could go in about any direction.  Take a good look at the bird; the stitches have been worked every which way: horizontally, vertically, diagonally, reversed direction, curved to outline, distorted to fill and taper.  With the exception of the outer border, bird legs, upper beak and eye, all the stitches are the Eastern. I had already stitched the outside border, but those X-stitches could just as well have been Eastern Stitch.

A note about the feed dish.  It's an old button, a 1/4 inch deep cup with scalloped edges.  The flat bottom is a 2-hole sew-through (no shank), which enabled me to stitch in the seed bead corn. Got to fatten the hen, you know.

The Eastern stitch tutorial and more information about TAST 2010
can be found here.  And you can see the work of other TAST participants here.


Wednesday, September 15, 2010

TAST 2010 - WOVEN TRELLIS & RAISED CHAINS


MY STORYBOOK DREAM
 
I sought a place to have my lunch
Beside a stream of tropical punch.
Fruits and berries came in handy,
But oh! those flowers made from candy.
'Neath leaves of green so sweet and minty
I rested my tummy full of plenty.
Leaning against the chocolate wood,
I tasted some bark and it was goooood.
Fluffy clouds of marshmallow cream
Floated past in my storybook dream.
When at last I woke from my nap,
I found this stitching in my lap.

TAKE A STITCH TUESDAY - WEEKS 27 - 29:  WOVEN TRELLIS and 2 VERSIONS OF RAISED CHAIN.  These links will take you to the tutorials for these stitches.  You can also visit the TAST Flickr Group Pool to view work by many participants.

All of the flowers are woven trellis with the exception of the one centered on the left; it is Version 1 of the raised chain as is the rainbow banner. The circle and scroll are Version 2.  A single strand of Caron Watercolours was used for the major elements, although the rainbow and border straight stitches are done with Caron Wildflowers, a single strand.  The accents on the flowers and other background stitches were rendered with Stef Francis silk or cotton perle.  

At this point I feel obliged to explain the poem.  I wasn't very happy with my woven trellis flowers, but they were better than the ones I ripped off another piece of fabric.  I didn't really want to work any more and decided to put a hold on the sampler until the next TAST.  I worked the two versions of raised chain, and still wasn't at all pleased with the look of the overall piece.  No wonder.  It was clearly hodgepodge and totally unacceptable to me.  I kept coming back to it and adding things, starting with the additions to the major flowers.  Before I added filler stitches I pondered for days about the big rainbow thingy.  knew it was a stream of something delicious fed by a soda spring.  But how could anybody looking at the stitchery connect to my childlike fantasy.  So I wrote the little poem to convey the imagery to the viewer, not so much that I thought viewers would be clueless , but more to my thinking the sampler couldn't stand on its own.  I like this stitched piece now.  It makes me happy and evokes memories from the naive imagination of my childhood when my mother read me stories about candylands, sausage trees, lemonade seas and popcorn snorting dragons and Shirley Temple sang about the Good Ship Lollipop.


Sunday, August 01, 2010

TAST 2010 - SLIPPED DETACHED CHAIN


I like the way the slipped detached chain can make blossoms.  My background is cotton duck.  I did a running stitch border in a rayon cord and later, to my regret, wove in the novelty yarn which I now find distracting and would remove, were I to have another use for this sampler. 

I laid foundation columns of feather stitch with a single strand of Watercolours ("wildberries"?) then proceeded with the blossoms in the same thread.  I worked from top down and started with single slipped stitches, then double and finally triple toward the bottom.  I wanted the droop effect atop the second column, so I used French knots to represent spent blooms, followed by reverse pointing single slip stitches for fading flowers, then proceded as I did with Column 1.  To bring filler to some of the negative space I stitched a "background" vine in the rayon cord, leaving it unembellished.  With some #5 purple perle I made a few bees.  It occurred to me to make a butterfly using 2 detached chains with the slipped stitches between them, but I didn't really know where to put it.

Back to the border.  I like it on the right side.  On the left it competes with the floral column, and it's bugging me so much I've got to remove it.  Yes-s-s-sss.

Monday, July 19, 2010

TAST 2010 - BUTTONHOLE WHEEL CUP

Ole!  Week 20 of Take a Stitch Tuesday:  buttonhole wheel cups.   I started with wheels that were too large  to create, say, a lily of the valley blossom, but I still managed some variations using the basic technique.  I forgot to take a pre-embellishment scan; it would have made descriptions easier.  I did like it plain, and could easily have filled in with small cups and partial fans. I'll explain each flower starting at the top and from left to right:

Row 1: 
1)  Large yellow wheel with picot edging and woven spokes (2 spokes up, 2 down).  thread is a variegated perle (DMC, I think). 

2)  Coral wheel, worked from the inside and pulled tautly to create spikes on the outsidew (most are covered).  Thread is one strand of Caron Watercolours.

3)  Large rainbow colored wheel (Caron Wildflowers "Tahiti").  It's a little hard to see, but there are 2 ruffled edgings.  After completing the first buttonhole round, I began another toward the inside.

4)  Multi wheel with buttonhole worked from the outside as shown in Sharon's tutorial.  This wheel had 16 spokes.  I first tried wrapping them four at a time, but the resulting triangles were not even .  For the do-over I wove up and down four spokes at a time.  I tried changing the up and down positions about halfway, but it looked untidy.  I left it as you see and put a French not in the center.  The thread is another Wildflower colorway.

Row 2 

1)  Small Tahiti wheel, edging to the center.

2)  This wheel has lots of increases in the first couple of rows, then I started decreasing to pull the edging toward the center.  It's like a pouch.  I could stuff it and gain more dimension.  I think it resembles an upside down Rasta cap with its Carribean colors.

3)  Small yellow wheel gets it bumpy texture from working 3 buttonholes in one stitch then 1 in the next.  It is worked from the inside toward the center, the same as the 3 coral wheels. 

4) Coral wheel, see above.

Row 3

1)  Coral wheel, see above.

2)  This is worked like #4 in the first row, except there are 14 spokes, the weaving over 2 spokes at a time.  One round of buttonhole edging.

Now I'm off to pack.  I'm taking a quicky trip to CA to see my dad who is now home after several weeks of hospitalization.  It's a brief visit between DH's chemo treatments.  I'm pleased to say both gentlemen are doing well, and so am I.  I'll be working on Week 21 out there!

Saturday, July 03, 2010

TAST 2010 - ITALIAN KNOTTED BORDER STITCH

Take a Stitch Tuesday - Week 16.  The Italian knotted border stitch looks deceptively like the knotted fly stitch.  Once you work it, though, you realize the major difference is where the knot lies.  In the Italian knotted stitch, the knot, specifically a French knot is formed outside  and below the "V".  In knotted fly, the knot is created in the V before adding the stem.  In other words, the French knot is the stem in the Italian version.
I began in the center with a single French knot, around which I placed 4 Italian knotted stitches, knots inward.  Then over each leg I worked the same stitches knots facing outward this time, and I worked in an extra stitch wherever there was a gap. Next I  worked stitches knotted outwards , beginning the legs from the previous row of knots.  The I worked a round of overlapping stitches.  This inner "flower" was done with two strands of silk floss.  I switched to a single strand of Watercolours and worked a circle of French knots around the flower.
From those knots I worked a round of Italian knotted stitch, knots outward and surrounded by two lines of laced running stitch.  The final border is comprised of pairs of Italian knotted stitches worked knot to knot, French knots in between.

Wednesday, June 16, 2010

TAST 2010 - LADDER STITCH


Week 15 - Ladder Stitch was love at first try.  It can be worked in a very orderly fashion.  Even better it can be varied both vertically and horizontally, shaped, worked solo or side by side.  But best of all can be woven leading to myriad other possibilities.  Here is a stitch I can play with.  I was delighted  with this little bit from my doodle cloth.   At first glance I thought it was pretty cool just as an abstraction.  Maybe it's all the Zentangling I've been doing lately; I sense a hint of 3-D perspective.


I didn't have too much in mind for my sampler other than a composition of grids.  It was when I started weaving in parrot colorway that the idea of feathers arose, and next came the challenge to see if I could build an avian shape with just ladder stitch.   This is what I came up with free stitching (no pattern or outline).  I think it's recognizeable as a bird?
Although I'm through with this for now, I seriously thinking of going Crafty Chica and adding sequins & beads to the background.  Pity you can't really catch the glitter cord sparkle.

Monday, June 07, 2010

TAST 2010 - BUTTONHOLE HERRINGBONE


Waiting on DH in another doctor's office, I'm working on Week 14 of Take a Stitch Tuesday.  After a short time a young girl sitting across from me says, "I like what you're doing there."  Never one to disregard a child's curiosity, I invite her to sit next to me to see first hand what I'm doing.  She was intrigued by the very things that appeal most to me, pleasing colors and lots of textures.  She was delighted to touch the sampler and oooh'ed as her fingers stroked the silk ribbon, and I was tickled that she picked up on the glittercord right away.
I  reached into my thread bag and  showed her how she could feel the difference between silk and cotton.    I was sorry I had no extra cloth with me or I would have her stitching in no time.  I had to settle for her promise that she would ask her grandmother to teach her embroidery.  I got no stitching done for the remaining wait, but I had the most extroadinary conversation with a young lady far beyond her 11 years.  We discussed our art interests which turned out to be mutual, as well; we pretty much ran the gamut of fiber arts.  DH showed up just as we were creating Zentangles, me on the back of my shopping list, she on an electronic device with a drawing program.  Time well spent.  And from now on my activity bag will include not only extra stitching supplies but knitting needles, yarn, crochet hooks and small pads for Zendoodling.  I intend to be prepared for the next teaching opportunity!


The first band started out as an up/down, every-which-way line of stitching that was probably more in line with my mood while I sat out DH's routine colonoscopy.  His results were fine, mine not so much.  I frogged it completely and replaced it with two repeat rows.  By the way, all the herringbone in this sampler is worked in #5 perle cotton.  The first band is buttonholed with a variegated perle from Anchor.

The whole time I'm working on this stitch I'm thinking of ways to depict waves.  The variation I made in the second band was to alternate the peaks and valleys in the two rows.  The buttonhole portion is a single strand of Caron Watercolours.   If you look at the last part of the second row, you'll see it's more angular than scalloped.  I left it that way to show I experimented with working the buttonhold upside down.  My conclusion is the scallops lay better when worked right side up.

 Band 3 is double herringbone buttonhole; ie, both layers have buttonhole over the foundation herringbones.   I suppose it would have looked more interesting if I had "woven" the second layer, but I wasn't energized enough to try. The underlayer of buttonhole is worked in cotton perle, possibly Caron Wildflowers, the upper layer is 2 strands of silk floss from Vikki Clayton.

Turn Band 4 on it's side for a short/tall effect.  I think this would work well for waves (picture different blues and pearl or crystal beads for white caps and spray) or for purple mountains'  snowcapped majesty.  And note to self:  use a thread with less contrast for the foundation herringbone.   Young Jada asked me two questions.  After explaining the TAST challenge and how it works to her, she wanted to know what kind of prizes were we competing for.  I hope my answer sunk in, that our reward comes in learning something new, trying something new, and that through our online show and tell we garner inspiration and encouragement to go on doing what we do just because we love to do it.  Of course then she wanted to know what I was going to do with the sampler.  I didn't think it prudent to say it would probably end up in a box or drawer with like pieces, so I suggested ways I could use it by making it part of something larger, like adding fabric and making a purse or a book cover or lid for a special box.  Jada thought it would be way cooler for me to stitch all my samplers together like a quilt.  It was sort of like our coversation.  One thread led to another until everything was unified.


Friday, May 28, 2010

TAST 2010 - RAISED CUP STITCH

OMG is that background what I think it is?  It is if you're thinking towel!  I made a batch of Earl Grey tea stain the other day and couldn't just pour the leftover down the drain.  What was handy was a threadbare dish, er, tea towel I'd used as a blotter from my last dye session.  "I wonder what it would be like to stitch on?", I mused as I stuffed it into the Pyrex measuring cup that held the tea.  As soon as the towel was rinsed and dried I found out.

I finished Week 12 early, so I was happy to keep my fingers from wriggling in anticipation of  Monday Night and the latest TAST temptation.  I worried (not really, this was a rag!) about embroidery needles and sharp points catching on  tiny, terry loops, but since the velour finish had long ago worn away from the printed front side, the fabric was very giving and yielded to my large tapestry/yarn needles with ease.  For this sampler I ended up using only #5 perle cottons and fingering weight wool/silk yarns.

About 2/3's down I started a line of twisted chain.  I wanted a little more height so I layered a second row right on top. You can see I got much better dimension with yarn seen in the single layer of twisted chain below (brown).  The gray line is knotted buttonhole stitch threaded with a piece shiny raffia, probably something that once tied up a package.  Seems like I had just gotten down that charcoal line of Sorbello than twas time to download Week 13, Raised Cup Stitch!  Am I the only one who has a pavlovian response to Sharon B's challenge posts?

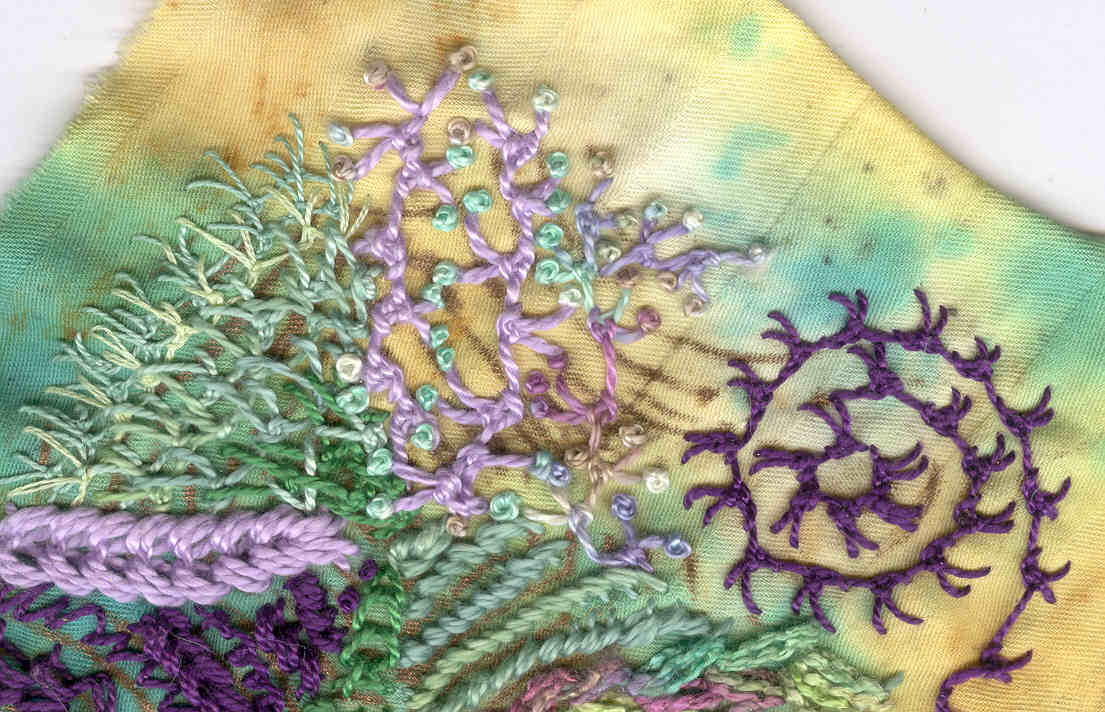
I got all of those raised cups stitched waiting in a doctor's office for DH.  They are all worked with the silk & wool yarns.  I love their organic shapes, how they flop and smoosh together.  The white one in the center  is an example of decreasing to make the cup turn inward.  The coppery bit you see are "stamens" emanating from a French knot.  I added irregular cretan stitching awaiting DH's lab work the next day, routine medical, btw.  I was satisfied that that finished the upper portion, but had to experiment a bit to get the rest as you see below.
I tried couching down some pussy willow yarn, had a little spiral going, but the color seemed to light.  I made it worse by weaving in a darker yarn.  Ugh.  Check out the raised cup centers, wooden and agate beads too big, faux pewter spacer beads.  No, no, no.  Too fussy.  Not in keeping with the rustic look I wanted.

What was I thinking?  That thing ,btw, is a freeform crocheted motif that's been waiting around forever to unite with its  kind to become a scrumble.

So I end up with unfilled cups and graduated French knots on the bottom.  Swapped out some of the beads in the other row with French knots --  and
a bullion (white cup on the left!).

And now a sort of tutorial.  Working the raised cup stitch reminded me of a motif I learned a few years back on the CQ Embellishers forum.  I was thrilled to make it, especially since I hadn't learned any fancy stitches.  The other Embelles used this effectively as sea anenomes in some of their wonderful underwater fantasies.  The motif is so simple, it really doesn't require illustration.

Thread a tapestry needle with yarn or chunky thread.  I find this easiest to do on my left index or little finger, but a pencil could be used instead.   Begin at the top finger joint and wrap the yarn upwards about four times, covering the tail as you go.  Wraps should be loose enough for you to work the needle underneath.  Pass the needle downwards behind the wraps, holding the top coil with another finger.  Now work around buttonhole stitch around, pushing the
stitches close together.  When the round is completed, weave in the end.  You now have a little ring motif you can stitch to your work and embellish with beads.  I used to like to make these using a funky variegated yarn, sparkly and frizzy.  They can also be used to make little nests as in the example below

This is from my project for Sharon Boggan's Encrusted Crazy Quilting class.  If  you haven't tried one her courses, you do not know what you're missing.  They are outstanding and comparable to a semester of study complete with textbook. 

Thursday, May 20, 2010

TAST 2010 - SORBELLO

I've become a real fan of knotted stitches for the extra texture they provide.   Sharon B gave us beautiful examples of Week 12's Sorbello stitch, which makes interesting patterns when used in repeats and presents itself nicely for the addition of bead embellishment.  She had one example of the stitches worked densely together as a filler, and she varied a thread or two adding color and textural variety.  I really liked the appearance, but I didn't want to copy her application.  I chose to apply a similar version as a border.  My stitches are more open, and I used a single variegated thread (Watercolours, one strand).
It's dense and textured enough, though, that glancing at the actual cloth, the stitching almost looks like crochet or chunky cotton lace.

My next variation was going to be a line of elongated stitch alternating high and low positions of the knot.  I discovered it was easy enough to work side by side stitches this way by varying the tension of the first part of the stitch .  When I went to work it on my sampler, I decided to do it in two passes, working the upper knotted stitches and leaving spaces for the lower knotted ones to be filled in afterward.  Using a single strand of a different Watercolour thread, the stitches were too dense.  Too many threads made the line too busy and the high-low knot effect got lost.  I'll try the technique another time, maybe even experiment with alternating colors.

After removing the second pass (lower knotted) stitches, I decided I liked the spacing, which led me to place the lower knotted stitches directly below their counterparts, creating a nice diamond in the negative space (perfect for a seed bead or French knot?).  To me the obvious next move was to at least partially fill the spaces between the stitches and balance the high-low with a centered knot at the join line.  For this I used 2 strands of hand dyed cotton floss that matched the deeper colors of my border thread.

At this point I realized my remaining stitching space was limited; spirals, curves and the like would have to wait for another project.  I opted to repeat the first two rows.  This repetition gave me another the appearance of little circles (a skinnier thread would have produced little diamonds).  Nice.  I could have left the sampler alone at this juncture, but something else was needed to fill the void between stitches of the center two rows.  I thought X's  like I did in the other rows would crowd and distract from the little O's.  I didn't want to introduce a new thread either.  I took a single strand of the floss and made the elongated, center knotted X's.  I like the look.  The background space is filled but subtly.  There is certainly room still for beads and French knots, but I'm going to let that go -- for now.


Monday, May 03, 2010

TAST 2010 - RAISED HERRINGBONE BAND

For these weekly studies I rarely plan a design first.  If the stitch is new to me, I practice the basics on a doodlecloth .  When I can grasp the mechanics of the stitch, I don my thinking cap then may or  may not scribble down  the variations I come up with.  From  this point I pretty much work spontaneously, although I do strive for a reasonably balanced composition.   I'm no stranger to the frog pond.  Sometimes experiments fail or need to be further modified.
  
This stitch was somewhat deceptive in that it changed with each layer. Combinations of threads and yarns I thought would work, didn't always.
I started with scraps of onion skin dyed Aida and cheesecloth.  I think scrappy, shabby and rough were in the back of my mind.  Generally I begin with what I deem will be the largest of stitch elements.  In this case it's the shaggy diagonal.
Instead of a satin stitched foundation I used a piece of oversized,  faux suede ric-rac.  I centered the herringbone over the zigs and zags and then wove in the chenille yarn.  Next was the light blue diagonal in #8 perle.  The herringbone is worked in silk/wool yarn, and the lacing is cotton suede.  I used the same yarn for the satin stitches on the curvy diagonal that intersects the ric-rac bar.  This element was intended to show curves and irregular foundation width.  Blue herringbone with French knots are two strands of cotton floss which is then woven with a strand of Vikki Clayton's silk perle from her dragon series.  I don't know if she still produces this color, but it's been one of my faves and now I'm out of it because I used it liberally throughout this sampler.  You can see it clearly in the unembellished, uneven satin diagonal in the lower left and echoed in the two vertical curves of satin foundation on either side of the big spiral.  Those two have cotton perle (#10 or#12) herringbone and then laced with strands of eyelash yarn (those are the brown strings you see in the picture, some of which are copper metallic).  What's really neat, to me, is the way the lashes arch and hang over adding a third dimension to the sampler.  A shame that effect doesn't show up in the scan (how could it, the lashes are all smooshed down!).  I later worked the same dragon perle as a running stitch border line before fringing the background fabric.

The large spiral is worked in Caron watercolours .  It stands "naked" because nothing I tried worked over it to my liking.  Ditto its counterpoint circle in the lower right.  This leaves the, um, motif in the upper right.  The horizontal brown bars are #8 cotton perle, as are the vertical blue ones.  Just for fun I wove one of the intersections.  Herringbone is worked over and beyond the horizontal bars in Caron wildflowers (same color as the spirals) and laced with an elastic  cotton yarn that's nubby with metallic copper flecks.

I encourage readers to discover how other participants explore the  TAST2010 stitches.  Please visit our Flickr  group site.


Tuesday, April 20, 2010

TAST 2010 - ROPE STITCH


ROPE STITCH - Week 7 of Take a Stitch Tuesday 2010.  It took me a couple of days to figure out this stitch.  It's not difficult, but I often have trouble when orienting thread under needle.  Remember I'm the one that has yet to master the very basic picot stitch in Hardanger.  Hopefully you can see my progress.

The background for the stitches is a scrap of hand dyed Aida cloth.  I worked all of the columns from the top and began on the left.  The first two columns are #5 pearl; the only difference is the number of threads.  Boy, the picture sure shows up the inconsistencies, and YIKES!, I moved over a thread about half way down .  Column 3 was loosely stitched with a strand of Caron Watercolours. It looks sloppy.  I think the reason it's uneven in places is that when I tried to take out a stitch or two it was it was
hard to pick up again.  I finally got the hang of it toward the end.

Column 4, I made the coils closer together, and it looks neater.  I had no difficulty creating the circle.  Column 5
looks like a whole 'nother stitch.  For this I made the coils right up against each other.  It's like satin stitch with more dimension. Column 6 was worked with silk and wool fingering yarn, and it behaved beautifully.  Not so with the slippery rayon thread I used  for the first layer of Column 7.  I stitched a second layer with the Watercolours, staggering the start.

Notice anything different about Column 8?  Nothing remarkable except I worked this and the remaining rows in the opposite direction.  See how the coils slant in a different angle?

I stitched the little sampler onto a piece of batik, the colors of which remind me of sangria.  From here on this becomes a work in progress.  I'll likely play with more buttons and threads.

P.S.  In response to Connie's remark that I may be too self-critical, I have to say I do try to be objective. This is a case where the sampler doesn't look that bad in the fabric, but I confess to shock when I saw it enlarged on the screen. Every flaw (just spotted another, but I'm not talkin') seemed to fly in my face. My posts usually detail my personal learning process of which self evaluation is an important part. When I make mistakes, I share them. I suck up the embarassment and remind myself that some muse wants me to learn by trial and error, to keep myself honest, and ego in check by experiencing creative lessons in humility. :-)

Sunday, April 11, 2010

TAST 2010: BUTTONHOLE EYELET FLOWER


I haven't viewed any of the other samples from the group, but I suspect my flowers may appear a bit different.  They certainly don't resemble anything close to Sharon B's prototype.  Still it was a good experience for me, always nice to add a flower to the stitching repetoire, and it did force me to practice multiple bullions. 

The background is hand dyed silk from Vicki Clayton.  I began with the red petalled flower.  Um, the flower was supposed to have only five petals,  but I don't think it matters how many.  What's wrong with my petals  is I was inconsistant with the number of bullion wraps, so they are not equal size.  I then switched to the three smaller versions.  I did count wraps.  They look askew, but really they are even and could lie flat if I pressed them or tacked them down; I preferred to let them have their more dimensional look.

I got bored with the basic flower, so I surrounded the second large wheel with two rows of flat-lying but curving bullions.  Then I worked the bullion "rose" between the 2 large flowers.  I began with a French knot and used different threads and colors for the petals.  I made bullion clusters next.

Looking at the goofy flowers stitched "naked" onto a piece of cloth, I decided I needed some kind of coordinating element.  This is what happens when one doesn't plan ahead and design first.  I added stems and leaves.  I'm sorry, I have to laugh, and it's perfectly okay for you to join me.  The first flower looks like it's wearing a hat (It's getting close to Derby time here), and the other big flower sprouted wings and looks more like shield backed by crossed spears.  Seriously, what's wrong here is no focal point!  Seriously-er, what's wrong with me?  The challenge does not call for a finished piece of art; no more than the exercise of practicing a new stitch on a doodle cloth is required.  Forgive me.  I type with tongue in cheek. 

The hand dyed (be me!) gauze drape is a nice touch, yes?  I have to brag that the silk perle and ribbon are also hand dyed from  my red cabbage experiment.  I forgot to say the cotton perles used for the flowers were all #5 DMC and the rest is Watercolours.

So what's with the business to the left?  Well, it may or may not be a preview of next week's TAST.  I had in mind to try partial buttonhole wheels as a seam treatment.  I hand stitched on a piece of blueberry dyed linen with the idea that I might continue the colorway next week.  I might -- or not.

Tuesday, March 30, 2010

TAST 2019 - Knotted Buttonhole Stitch


As you see I continued this week's stitch on the same fabric piece as w\Week 4.  I like this stitch because you can work it in just about any direction.  I've used this stitch before, so I did only three things with it this time.  On the left is a green patch where I tried to similate grass using 6 different threads.  I overlapped the rows (working from top to bottom) and made the stems different sizes and working a few of the stitches under previous ones.  The middle section looks kind of chaotic.  What I attempted was to create twigs with the buttonhole stitches worked from either side.  Most of this area was done in #5 perle, but I used a single strand of Watercolours to work a couple of "sprigs" and also the French knots.  On the right is a spiral.  I love how this stitch holds a curve and how the little stems also curve.  I finished early, so I now have plenty of time to practice bullion stitches for next week.
Below is the whole sampler for Weeks 4 and 5.


Monday, March 29, 2010

TAST 2010 - Portuguese Border Stitch


Portuguese Border Stitch
Originally uploaded by Fiberdabbler


Perhaps I should explain the funky background first. I know you would have difficulty recognizing it, but it's from the same sheet fabric and experimental session I talked about in my previous post. I was playing with Dylon cold water dyes. I honestly don't remember if this piece of cloth was used as a rag for clean up or if I was testing colors. Whatever. I rusted the colored results, the ran Shiva paintsticks over a rubbing plate. I found this piece stored with my textured surfaces samples. The lines on it made me think about the spirals and concentric arcs I wanted to try with the challenge stitch. I was thinking about the paintstick lines as a shortcut for marking where I wanted the foundation straight stitches.

I covered the area I planned to stitch with straight stitches following the contours of metallic lines.  I left some of the even stitching bare, as you can see, but hidden below the overweaving are straight stitches of varying length and orientation.  I tried several alternatives weaving over the bars:  1) changing direction from one row to the next; 2) single passes only
(eliminating the second journey); 3) changing direction of the single journeys from row to row; 4) working the two journeys over side by side short stitches instead over one longer base stitch; 5) I tried stairstepping using the two stitches in (4), alternating from one side to the other trying to make a zigzag appearance; I could not get it to work, and 6) weaving or lacing in such a way there is only a single strand look; result -- looks like the rungs were just looped or laced; I couldn't get the same V shape as in the original stitch.

Cotton perles were used and in one instance two strands of floss.  I'm not sure what the variegated boucle is, but it certainly enhanced the texture.  The rows below it were worked with a single strand of Watercolours with very subtle changes.